Wednesday, December 23, 2009

The walls have holes

Well, Newt managed to put holes in the walls, before the concrete went in. He apparently couldn't find the 6" pipe this morning, so the pipes that are through the walls are 4", and for the water heater exhaust, he cut a big 6" wide hole, and stuffed it with foam to make a hole through the concrete.


Outside the back wall, pipes for well and solar thermal, ventilation intake, and electrical


From inside, the electrical is on the left, and in the garage. The others are in the utility room.


Air intake for water heater up above, and a big hole that will be used for the exhaust from the water heater, and the batteries.

Newt did not want to put holes through the beam over the garage, so the radon and dryer venting will have to go over the wall, and probably involve putting a hole in a steel end plate. I should have gone out this morning. I knew where I wanted some of these holes to go, and I should have been there to discuss it with Newt instead of doing it over the phone. I think we can handle things with these holes, but there are a couple code items that may cause problems dependent upon how the inspector interprets them. One of those, letter versus intent sorts of things. I guess I still hadn't planned and drawn enough detail for what I wanted to do.

I went out at lunch time, and as I drove along, I passed by the last concrete truck leaving my home. The pump truck was just getting ready to leave as I pulled up the driveway.


 Tim and Doug were smoothing out the top, and making sure it was all the correct height.

They put up a laser level on one corner of the walls, and Doug went around with a little sensor and checked that the tops of all the walls were level. I didn't climb up to see the top up close, but they looked like they finished it like a floor. These guys seem to work pretty fast, but they take care in what they do. I am quite pleased with what I have seen.

 
Anchor plates sitting on the plank, ready to be put in the concrete.

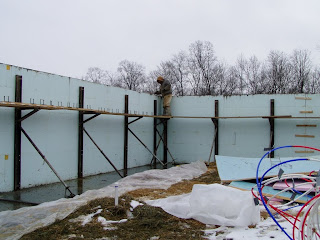
If this was a basement, with a standard sill plate on top (bottom board in a framed wall), they would embed bolts into the wet concrete, with the threaded part of the bolt sticking up. Then when they put the sill plate on, they would put nuts on the bolts, and the sill plate would be bolted down to the concrete. With the steel trusses, they are going to weld the truss onto the wall. To do that, they had plates with bolts welded on which they embedded in the concrete. Then they will weld the trusses to the plates when they are in position. In the picture above, you can see the bolts sticking up on top of the scaffolding. The bolts got embedded in the concrete, and they tapped each plate down until it was the correct height.


Setting the plate at the correct height

They ran string along the top of the walls, and straightened those out.

 
 East wall


North wall, with plates embedded in the concrete

Jake was out there, collecting usable foam, and plastic sheeting. When the concrete guys were finished, he stayed, and got the floor cleaned up. He also helped me put a tarp over the PEX. It isn't supposed to be exposed to sunlight for extended periods. The tarp should protect it somewhat. The floor is still in need of a mopping, but that may as well wait :-) I went back out, and got some pictures of the inside just before dark, with an almost clean floor.


 Front wall


View to to the south west

I don't expect to have much to report on until into January. So, have a merry Christmas, and a happy new year.

Tuesday, December 22, 2009

Ready to pour walls...almost

Well, they finished the wall forms today. But not without incident. Newt called me this morning, and wanted to know what I wanted to do about the window openings. What do you mean?! Well, the vBucks they sent us, were made for a 6" concrete core, not an 8". So they were basically 2 inches short in their depth. Well, that sucks. Also the place that Newt picked them up from isn't the place that makes them, so he couldn't just go ask them to quickly make some new ones.

We have done a lot to keep wood away from the outside on this house. I love the look of wood, but I don't want the maintenance that it brings with it, in an application where it is exposed to the elements. Or the risk of hidden problems if bugs or water get to it. I really didn't want us to fall back to wood bucks. We talked about the options, and decided that we should be able to use the vBucks, and just add wood as needed to finish out the window framing. As it turns out, Doug the concrete contractor working on my home, is friends with a fellow that Newt was just telling me is one of the most experienced with ICF in the area. Tim who has done a lot of ICF work, hadn't been available for this project, but it turns out that he apparently had some time available this week, so Doug got him to come over. He had some ideas. They attached the vBucks on the outside of the Nudura forms, and then used wood to brace them for the pour, and added a bunch of spray foam to seal up the joints.


Not as clean on the inside as it would have been with the proper vBucks.

There will be wood trim on the inside, so it will cover over this bit of OOPS, anyway. The image above has the guest bedroom window, and the master bedroom window. Here is the hobby room window and garage opening. They have some more bracing to put on the garage opening tomorrow morning.


What a messy floor.

I talked to Newt about all the plastic sheeting that we are going to have, and the foam that is still usable, including the chunks of Nudura that won't be going back to the supplier. Sounds like Jake is going to work through our scrap pile, and move the usable materials off to the side. We won't use the Nudura or the plastic on the house itself, since they may not be completely intact. But we are going to take whatever we can, and use it to add extra insulation extending out from the walls, and shedding water further away from the walls.

 
Some of the extra foam we had for the underfloor insulation.

We will lay the foam on top of the backfill when we get to the top of the walls, and lay the plastic over the rubber membrane which will be making the roof water proof. The edge of the plastic will go under the drainage layer (which sits on top of the rubber). This will make most of the water that comes off the roof in the drainage layer, keep going out well past the walls, instead of right down them. The drainage system around the bottom of the walls will then have less water to get rid of. This also means we have less waste to haul to a dump. Hey, I paid for it, if I can use it to make the house better than what was designed, I am going to.

From the outside, it is now looking like something other than a hole in the ground.


Guest bedroom window on the left, then front door, then dining room window.


Starting to see what it is going to look like from the front.


From the south east corner.


From the north east

 
For the amount that will be exposed on the south side, there is quite a bit of window.

Did you notice anything funny in the last two pictures? Take a look at the north wall, and the east wall. They have made every effort to make sure the bottoms of the walls are straight. So when I saw these, I called Newt, and mentioned that it looked like they need to fix the tops of the walls. He explained that they bowed them in on purpose. During the pour, they will get shaken about, and they want them leaning in on the braces. Then once they are done with the pour, they will run a string along each wall to give them a straight line to line up on. They will adjust the braces to push the walls out, while the concrete is still wet, so they are straight. The braces can't really pull the forms in, so they have to make sure they are leaning inward against the braces, before they pour concrete in them.

The other thing that I realized as I left, was that while we have the large holes set up, for the windows and doors, we don't have the small holes cut through the walls for the vents, or the well, or the electrical. Uh, oh! Ok, time to mark up some pictures and talk to Newt. We discussed where the holes will go, and how big. By the time they pour tomorrow, there will be a bunch of 6 inch holes in the back wall, and on the garage wall.


Now a while back, it was mentioned to me, that I should try to put together a set of images to record the progress of the home. Well, I decided to look back through the images tonight, and here is what we have so far...


2009-10-10 Corners surveyed according to my measurements, I don't like where they ended up, so we went back to where I had staked them.


2009-10-21 The morning when they came to look for water


2009-10-31 I have a well, and the trees have lost their leaves

 
2009-11-12 Digging a big hole

 
2009-11-17 I have footers, but you can't see them here


2009-11-24 They are busy putting gravel, and drainage into the hole


2009-12-22 Plumbing drains, floor insulation, radiant tubing, and a floor has been poured. We are ready to pour the walls.

Monday, December 21, 2009

More walls, and long screws in the floor

I talked to Newt. They were out there putting up bracing and more of the wall forms today. They are planning on finishing the forms tomorrow, and pouring on Wednesday. I think I will need to pack a lunch and drive home for lunch on Wednesday. I went out today as soon as I could, and was racing the setting sun. I got some photos before it was too dark.


Garage door and hobby room window, framed.

The back wall and the garage side wall have now been fully formed. They are braced, and it looks like they are ready for concrete.


Here they have put the braces on the walls.

They still have to finish a couple rows of forms on the east wall (family room and kitchen). But they have the braces in place, so that will probably go pretty fast tomorrow. They have to put in the braces, and finish the forms for the front wall. That will probably be what they spend most of their time on tomorrow.


View from in the garage toward the master bathroom and the hobby room.

They have the bracing in place on the west wall as well. The vBuck is installed for the garage opening, and the hobby room window. They did have to do some bracing in the garage just into the ground. But the rest of the bracing is tied into the floor slab...


One of the feet on the bracing.

My poor floor. For the best performance from the radiant heat floor, the tubing and wire mesh should have been pulled up into the slab, off the foam. However, I saw an empty box from 2 inch drywall screws. I am hoping that what they are driving into the slab is shorter than that, or that they didn't get the tubing pulled up very far into the slab. The pressure gauge is still reading pressure in the PEX. However, if they do puncture a line, we may not know, until they take the screws out.


View from the family room, out of the garage door.

Snow, hay, straw, water, forms that still need to be put up. It is pretty messy in there. Hopefully tomorrow, I will be able to take pictures of all the forms ready for concrete. Hmmm, there is a lot of plastic sheeting that is probably going to still be perfectly usable when we get done with this stage. I am going to have to go see how I could make use of that, if they are going to just toss it when they are done with it.

Sunday, December 20, 2009

Over the river and through the woods...

Saturday, I woke up and saw a nice coating of snow. I decided I had to go see what sort of photos I could get. Click on the photos to get the full size.


Fly over

Heading out
 
Watch out for that tree!

Look left...

Look right.


Have a nice day :-)

Thursday, December 17, 2009

A quiet day

Today was a quiet day. Newt went off to get the bracing for the walls, so the concrete guys can continue putting the forms up. I went out, and waited for him to show up, so I could help unload and we could talk about a few more details. Other than the occasional vehicle going by, the only sounds were from the various birds singing to one another. I sat on a hay bale, and enjoyed the peace.

Here is what things look like.


When someone asks if I live in a barn, I will answer....

I saw that what they did to protect the concrete, was they put down plastic sheeting, then put down the foam/straw/hay on top. Before anyone asks me, and to see who has been reading the blog, the tan things left of center are called vBuck. When they put windows and doors into poured concrete walls, they need to put in a form to keep the concrete from filling in the hole where the window or door will go. They put in what are called bucks to provide the form, and also the window or door frame is typically attached to this buck when the time comes. Bucks are usually made of wood. Although I don't have many openings, the walls are a little over 13 inches thick. So it would be quite a bit of wood, and somewhat of a challenge to put together. They would probably have to use pressure treated lumber and custom cut multiple boards to fit the wall. The vBuck is made of vinyl. Not the most environmentally friendly material, however with the air spaces inside, it should have more insulating value than the wood bucks would. It should last as long as the house does.

Newt brought the bracing for the wall forms, which will have to be attached to the floor. Yes, that means holes in the new floor they just poured :-( He also brought the curved vBucks for the tops of the front windows.

As they finish the forms, and get the vBucks in, I should be able to get some good photos, and the house will really start to take shape.

We discussed some of the timing of the concrete pours. The walls can be poured as soon as the forms are ready, since they have the insulation from the forms to protect them from the cold. We are going to wait to pour the garage slab, and the piers for the solar panels, until after we have the roof on. Then the garage slab can be protected from the cold, right after it is poured. The piers for the solar panels, will be protected from cold by the ground itself.

Tuesday, December 15, 2009

From finished floor, to barn floor

Today it was much colder than yesterday, and the temperature was expected to get into the teens overnight. Concrete needs some time to cure, before it is exposed to temperatures that cold. So, it needed to be covered today.

The concrete crew worked on putting up the forms that Newt took to the property last night. They made pretty good progress. The back wall (north side) is almost complete, and the east wall has 2 more courses of forms added.


Back wall, 8 1/2 feet from floor to top.

Then they laid all the foam we had out there, including the rest of the Nudura forms, on the concrete to help it stay warmer. There wasn't enough foam to cover the floor, so they got some straw, and some hay, and made my floor look like a large stall in a barn.


Hopefully the deer won't find it, and consider it a good place to eat and sleep.

Monday, December 14, 2009

Today was a good day for concrete

Well, I now have a floor.


When I got to the property this afternoon, they were just finishing, the finishing.

Overall, they did a very nice job. They even put a raised curb, on the utility room floor on the garage side, except where where the doors into the garage will go. There was one issue I spotted. They were supposed to leave the outside foam on the Nudura where the front door will go. That way there was going to be insulation on the outside of the floor slab. Instead they cut the Nudura all the way to the footer. If Newt or I had been there, we could have corrected that one, before it was cast in concrete.


There should be Nudura foam just inside that board, instead of the concrete coming all the way to the board.

I will have to see what we can do as far as adding insulation on the outside, and extending the door threshold to prevent the slab being directly exposed to the outside. I don't want the slab to conduct heat right out under the front door in the winter.

The power trowel, looks to have created a bit of pattern in the surface of the concrete. I will have to see what it looks like when it is dry and curred. It will be interesting to see how that plays with the concrete stain.


The trowel left a pattern.

We are having some trouble with the rain, loosening up the dirt around the excavation, and causing it to fall into the hole. They put down some plastic to try to reduce that. You can see the plastic on the ground in front of me in the photo above.

One of the concrete guys almost had to give me CPR. He looked at the pressure gauge attached to the PEX, after they were all done, and told Doug (the guy in charge of the concrete crew) that the gauge wasn't reading any pressure! Doug looked at him and said WHAT! and I about fell over. Then he said he was joking. It was at the same pressure my dad and I left it with last night.

The tubing in the utility room ended up looking like my hair in the morning. After we connected all the loops together last night, and added a bungee to hold it together off of where the floor would be poured, it looked a little tangled.

 
They trimmed the board that the PEX was attached to.


Oh, what a tangled web we crimped last night :-)

I should correct myself before my family does. My hair is worse than that in the morning.

Newt brought the rest of the Nudura forms to the property, so that they can finish the wall forms. They didn't pour any concrete in the wall forms today. They just wanted them in the correct place for the floor pour. It took Newt a little while to get to the property with the load of foam he had on his trailer. He said it felt like he was hauling 5000 pounds. It was stacked pretty high. We didn't unload it, Newt just parked it. With the forms strapped down to the trailer, that is probably safer than if we had unloaded them and stacked them.

We discussed the pour, and the issue with the door, and some items about the waterproofing that will be going on the walls and roof.

While I waited for Newt this evening I enjoyed the quiet, with just the sound of birds, and the babbling of the creek, it was lovely to sit on the pile of gravel outside of my home. Newt said, it is about time I stop referring to it as "the property". I will have to see if it is just my home, or if I come up with a fitting name to give it.


This was the sky I enjoyed as the concrete crew left.

Sunday, December 13, 2009

Under pressure

Friday, I went out to the property and got setup to try to finish laying the PEX. As I was working on getting a fire started, the building inspector came by. He was there to check on things for the permit to pour the slab for the floor. I talked to him, and answered the few questions he had. He was satisfied that things were in order, and handed me the permit. As he was leaving, Newt and his son Jake showed up. Newt talked to the inspector a bit, then the inpector left. Jake was there to give me a hand finishing up the laying of the PEX (although, taming of the PEX might be more correct). The weather prediction for Monday sounded promising, so we wanted to be ready so the concrete guys could get a slab down, if the weather cooperated.

It was a chilly day, but not near as bad a Thursday had been. Newt ran and got us some lunch, and Jake and I started laying the PEX. Then after a chilly lunch around the fire, Jake and I went back to work with the PEX. Getting the PEX off the rolls, without it tangling up like an overextended Slinky, is a challenge. With two people, it is easier. The bathrooms presented interesting challenges. First, I want to have the floor warmer in them than the rest of the house. So I wanted to place the tubing closer together. This will result in a more even heating, and add more heat for a given area of floor. The challenge was that the tubing wasn't wanting to bend for the wide loops I had been doing, so narrower loops, so that the tubing would end up closer together, were going to be out of the question. I had to use the wide turns, but overlap the run. The master bathroom, looked organized compared to how the guest bathroom turned out.


Not a lot of space for tubing in the master bathroom. Some is going under where the tub will be, on the right side.


No, I did not just throw it down on the floor. But it does look chaotic doesn't it?

The other challenge with the master bathroom, was that it was going to use almost as much PEX getting to and from that room, as I was going to lay in the floor of the room. To try to reduce how much heat I loose to the other parts of the floor, as I get over to the master bathroom, I added some insulation to the PEX. We didn't want to add foam to the PEX, since that would have made it more likely to try to float to the surface when they do the pour. What I did instead, was to put the PEX through PVC conduit. The PVC won't transfer heat as easily as the PEX. So it should reduce the heat lost before the water gets to the master bathroom.


Here you can see a couple sections of the grey PVC conduit with white PEX coming out of it.

Jake and I manage to finish laying the PEX. We were pretty chilly so we called it a day. Had I known how Sunday would turn out, I would have done some more work out there after Jake left. Here is how we left things on Friday:


All the PEX laid, now we need to pressure test it.

Sunday (today), my dad and I came to the property to pressure test the PEX. I wanted to make sure there were no leaks, before they tried to pour the concrete. Unfortunitly, with other obligations, it was late afternoon before we could start hooking all the loops together. We had a fair amount of rain overnight, and earlier today, and everything was soaked. But at least temperatures were moderate. I put a plug in the end of one loop, then we went from loop to loop, and connected them all together as one long loop. By the time we finished that, it was dark. I turned on the headlights on the truck, and we kept working. We got the pressure test fittings connected on (we put those together Saturday night, wait till Newt sees what we put together). Then it was time to cross our fingers, and pressurize the system with air. I had bought a little compressor, for filling tires. It worked reasonably well to get the system up to a little over 20 PSI. Then we used the air that dad had stored in his compressor back home, and boosted the pressure some more. It was at about 25 PSI and was holding pressure. I decided that I would come back after we had some supper, and see if it was holding. If it wasn't holding, there was nothing we would be able to do, and the pour would probably have to wait. When I came back after dinner, about an hour later, it still had the same pressure. So it looks like it is holding. So if the weather is OK, and the contractor is available, we should be able to pour a floor tomorrow.