Wednesday, October 27, 2010

Burying a house

Last Saturday, Matt was able to go out with us. With Matt, my dad and I we were able to finish covering the north wall with drainage material. We also finished loading the scrap foam, and plastic, and extra drainage material into the ventilation/power trench.

The last sheet of drainage is installalled on the house.

The trench is now ready for backfill.

Adam had planned to come over on Saturday, but he found he had some prior commitments, so continuing to backfill would have to wait till Sunday afternoon. They were predicting some gusting winds, so we threw some dirt in the trench to help keep things in place. It wasn't much, but I figured it would keep the edges down out of the wind, and that would keep things in place.

While Matt was there, we got the pieces put together for the drip edge that will go over the garage side, once we have the siding on. Having three people to handle these big pieces for getting them on the roof, really helps. Matt also helped us move a number of the extra pieces of wood, up into the joists in the garage, where they are handy, but out of the way.

Sunday, I went out fairly early. I worked on cleaning and straightening up materials and tools. I was expecting to do that in the morning, then in the afternoon Adam was to come over and continue backfilling. Well, part way through the morning, I heard the Bobcat coming up my drive. Ok, time to work with Adam to ensure things got backfilled the way I wanted, and to answer any questions that came up.

 Adam filling in the trench.

After Adam had used up the dirt that had been excavated originally he was having trouble digging through the dry clay. We went and looked for places on my property where the ground might have more moisture, and so be softer. He tried a couple places. He found a spot in the woods that looked promising. As he started working on that, I went to get some lunch. When I came back, I saw that he had managed quite a bit of filling. He had also thought the the place would look better with a bush on the side of the house. It is a thought, but it wasn't even up to final grade, a little soon to be planting bushes.

Was he serious, or just showing off how good he could manipulate things with his Bobcat?

Adam finished what he could do until we had some rain to soften things up. So he left, and shortly afterwards, my folks showed up. My dad and I worked on getting the furring strips up on the front of the house. I wanted to get it ready for siding.
 
All the furring strips are in place on the front. Ready for siding.

Then we worked on the overhang some more.

Monday, Adam went out and got some more dirt moved. We were still waiting for rain to show up. They kept predicting it, and it kept failing to show. Then on Tuesday, we had a large line of storms come through and drop a good amount of rain. The storms brought high winds which looks to have knocked over another tree, but the rain was good. Adam went out this afternoon, and got more earth moved. The rain had helped, and he was able to move quite a bit, before he got back down to dry clay.

North side almost completely covered.

Adam was able to almost cover the whole north side. He still has a bit more to get it buried, and more fill is needed to get the grading the way it needs to be. He is going to do some more work on it tomorrow. Hopefully, when I get out there, my house will be fully buried.

Wednesday, October 20, 2010

A little oops

Monday, I called the inspector, and told him that the trenches with the conduit for the electrical, were ready for inspection. He said he would be able to inspect that day. I went out after work, and found he had left my inspection paper for me, indicating that the inspection was passed.

So, I worked on pushing some dirt into the ventilation trench. I wanted to get some dirt in, before I had Adam push a bunch in with the Bobcat. I talked to Adam, and he had Tuesday off. So he said he would come over and push some dirt into the trench so I could get the pipes covered, and he would also push dirt up against the North wall and around the pipes coming out of the house.

In the afternoon on Tuesday, Adam gave me a call. He had moved most of the dirt he could, until we finished filling the ventilation trench. However, there had been a problem. One of the pipes broke near the house! Not good, not good at all. After work, I went out to check on things.

Generator trench all filled in

Vent pipes partially backfilled

 Dirt in the trench, ready for me to spread

The pipe at the top, has a bit of an issue!

I found that it wasn't the pipe that had broken, but the adapter that goes from the 4 inch pipe, to the 3 inch pipe. I scratched my head a bit, on how I was going to connect these back together. I cut end of the 3 inch pipe with what was left of the adapter. That gave me a clean pipe end to work with. Then I saw that the adapter had only gone part way into the fitting. I carefully sawed the end of the fitting off, and took all of the adapter with it. Now I had two clean pipes, how to connect them. I wasn't going to be able to use the same adapter, since it wouldn't bridge the gap that was now present between the two pipes, and I wouldn't have been able to glue it in place without being able to move either pipe. I found that with the ends off various size pipes I had on hand, I could make an adapter that would have a chance of connecting the two pipes.

Marcus came out to lend me a hand, and any advice he could. He helped me cut the pieces I needed. Then I put them together. The fit between two of the pieces was not real good. There was a gap that would have to be filled in. I took it back and looked things over. Marcus did not feel that it was going to work vary well. As I looked at it, I decided that I agreed, this just as not looking like the right way to do this.

Today, I went and bought a different adapter, and a rubber coupling. The adapter went from the 4 inch pipe, to 3 inch pipe. The coupler allowed me to connect the two 3 inch pipes, without having to move them. I put the coupler on the one pipe, then lined it up with the other pipe, and slid the coupler over onto that pipe as well. I tightened the coupler, and it seemed to make a good joint between the two pipes. I now wish I had taken this approach originally.

Top pipe now has a rubber coupler.


To reduce the likely hood that there would be added strain around the pipes, I took some of the sand that was still sitting up on the roof, and brought it down, and packed it around the pipes after I tamped down the dirt that was under them.


Sand packed around fittings and pipes.

After I did that, I worked on getting the dirt smoothed out in the trench, and covering all the pipes.


Pipes are all covered.


Then I started to pull plastic sheeting, and foam pieces out of the house and the woods. I have quite a stock pile of foam and plastic that were cut off other pieces, but which are perfectly usable for in the trench. I read about covering the ventilation pipes with insulation and plastic sheeting, to make the pipes act like they are buried deeper than they are. The whole idea behind these pipes, is that they will moderate air temperatures all year long. To do this, they need ground that is significantly warmer than the air in winter, and significantly cooler than the air in the summer. With the ends of the pipes away from the house ending up only a couple feet underground, the ground will warm up during the summer and get too cold to have much value in the winter. To help isolate the ground around the pipes from the air temperature above ground, I am adding insulation. The plastic will reduce the amount of water that gets down into this soil, which would otherwise help transfer heat from the surface. This should allow the deeper ground temperatures to play a more significant role in the temperature of the pipes. That is the theory any way. If I had to buy new foam and plastic for the trench, I would probably forgo the expense, and just go with the dirt by itself. However, as we used foam for under the slab, in the walls, and on the roof, I kept the scrap pieces back in my woods, and some in the house. I have a large stock of foam pieces that wouldn't work for much else, but can be laid in the trench and then buried. Even if the foam has a minimal effect, it is better than just sending it to a landfill where it would just take up space. The same goes for the plastic that will go in the trench. I am using scraps that have been cut off the plastic that was used for the waterproofing.

Monday, October 18, 2010

Installing an organ

This last weekend, we made some good progress. But before I get to that, I thought I would share some pictures of a little Fall around my house.

My neighbor to the east, is not building yet, and so is just letting his part of the field grow wild (this doesn't really contrast with what I have been doing but...). The trees put on quite a show before they lost their leaves, and we have some fall flowers showing a lot of vigor.


Quite a lovely display for the Fall. Other than where Adam and I have driven my truck and his Bobcat through, my leach field is covered in grasses and flowers. We haven't been having much rain, but the wild growing plants don't seem to be having that much trouble with it.

With the well and communications conduits installed in the trench, it was time to get more backfilling done. Dad took last Friday off, and Adam was also off. So mom and dad went up Friday morning, and Adam brought over the Bobcat, and worked on getting more grading done now that some of the ground was softer, and also worked to do some backfilling.

He worked on the area in front of the house, grading it down so it sloped away from the house better, and moved some of that up onto the area behind the retaining walls.


Adam worked on getting the grading on the east side smoothed out, and got most of the rest of the east wall buried.


He started the backfilling on the north side now that we had the first sheet of drainage material in place, and the well trench could be filled.


He filled in the well trench out to just short of the well.

 I am standing where there had been a trench with dirt piled on either side.

I went out in the afternoon, and dad and I worked on getting the rest of the pipes coming out of the wall connected up. We had a pipe that will eventually carry hot water heated by solar panels. That will be added after the house is lived in for a while, so I can get a good estimate of how much solar I need to install. So for now, the pipe just has caps on the end, so it will extend up to where the backfill will be, and can be connected into at a later date. It splits into two pipes. One will have an insulated pipe that will carry water to the collectors, and the other will carry hot water back from the collectors in a second insulated pipe. Other than where they come through the wall, they will be kept separate.

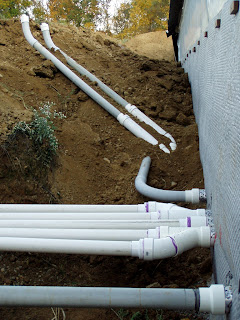
The well conduit is covered by dirt. The two pipes at the top, are for the future solar thermal system. The pipe with the sharp bend, is the communications conduit. The set of 5 pipes coming out, is for the ventilation. The gray pipe at the bottom is for the electrical power lines.


Sunset Friday evening.

Saturday, mom and dad could only spend half the day. So, we got up early and headed out. First we concentrated on finishing up the power conduit.

Power conduit extended down to where vent house will be, and where generator trench starts.

Then we worked on installing the organ. This house will have very little air that will leak through cracks. The walls are concrete, the roof is sealed and covered in dirt, and will be sealed to the walls with spray foam. The windows and doors will have some leakage and there will be some air flow through the fan exhausts. But most all the air flowing into the house, will come through a set of pipes laid underground. They will function as the wind pipe for the house. Allowing air to flow in to replace stale air. As dad and I worked on them though, we found they also acted like a giant set of organ pipes. If you tapped on them, you could hear a pitch, and multiple echos. When we had to trim the pipes that were already glued on, the noise of the hand saw played through them in an odd fashion as though they were 50 foot organ pipes. I think only an elephant would be able to actually appreciate those acoustics.

As pieces were added, we had to bend the pipes over, since the trench isn't perpendicular to the back wall.

After mom and dad left, I worked on shifting gravel, and putting pieces of pipe in the trench. It was too unwieldy to glue it by myself, but I could get the pieces all laid out so that we would be ready to glue them on Sunday.

All the pieces in position, cut to aproximate length, and ready to be glued.

Sunday afternoon, we got back to work. We took the pieces apart, and glued them each where they needed to be. We also took some of the foam board that was left from other work, and made pieces to hold the ends of the pipe in place. The foam blocks that were place in the trench to hold the pipes in place as they are backfilled, are packing that was from my garage door. Why waste it?

All the pieces assembled and glued, and bags over the ends to keep dirt out.

I was ready to have the inspector come out and check on the electrical conduit. That is the only pipe in the trenches that had to be inspected. I called the inspector this morning, and this evening I got out there and had a inspection approval waiting for me. Time to get the trench backfilled!

I worked on pushing some dirt from the side down in around the electrical conduit and the one vent pipe. It looks like Adam is going to come over tomorrow with the Bobcat, and work on backfilling more of the north wall, and the generator trench.

Adam is also going to push some dirt in the bottom of the ventilation trench, so I can get the pipes covered, and put in foam and plastic sheeting. I am going to put in a lot of the foam that I have left over from other work, to help with the thermal performance of the ventilation pipes. The added insulation should make them behave like they are buried deeper. This will help cool incoming air in the summer, and warm the air coming into the house in the winter. This way, I can also make good use of a bunch of the scrap foam that is left, instead of having it hauled off to a landfill.

Sunday, October 3, 2010

Plastic pipe, plastic sheets, plastic lumber...

Do you sense a theme? The weather didn't quite hold off, but we have a very productive weekend in spite of it.

I had plans for this weekend, and I knew we would need extra hands for the work I was thinking of. I talked to Kevin, and he said he was available on Saturday. So mom, dad and I headed up to the property fairly early on Saturday. The weather predictions kept increasing the likelihood of rain for Saturday. I was hoping it would hold off. We got there, and it was a beautiful sky, with hardly a cloud. However, I knew there was a whole line of storms headed our way. Since the weather was holding, and the trenches were fairly dry, and we would have Kevin's help, I decided that the first thing to tackle, was trying to get some of the lines laid in the trenches.

My dad and I started to lay the pieces out for the conduit that will carry the lines to the well. As we started to lay the conduit out, I realized that once we got the conduit in place, is was going to hamper efforts to put the drainage layer up on the back wall. So we set the conduit aside, and started to work with the drainage materials. About this time, Kevin showed up. He helped hold the material, while dad and I got it unrolled against the wall. After we had it leaning up against the wall, Kevin and dad, held it in place, while I attached it to the wall. Once that was done, we worked on getting the conduit for the well put in. We had to dig out more dirt in the trench to get the conduit to line up between the trench and the pipe coming out of the wall. It took a while, but we got it put together.

Then, we worked on getting the conduit started for the communications lines. This conduit will carry wires back to where I am going to have my antenna tower. It is going to run out through the well trench, and then go on a ways further to get to where the antenna tower will be. The pipe coming out of the wall for this is a few feet away from the well pipe, so we had to bring it over to where it would be able to head into the well trench without difficulty. We were making good progress on this line, when the rain moved in. I knew that it wouldn't take that much for the trenches to become an awful muddy mess, and I didn't want any of us to get cold from the rain, or the dropping temperature. So I called an end to that endeavor, and we moved to working on the overhang.

Here are the conduits we worked on.

The rain wasn't heavy, and was falling mostly straight down, so we worked on the overhang, where we could stay mostly out of the rain, but still get work on the outside of the house done. I wanted a waterproof layer under the siding. So we attached some tape to one edge of some plastic sheeting, and used a staple gun, to temporarily attach it across the front of the house. I had fabricated furring boards to go across the top of the wall, but we needed something to hold the plastic sheeting in place while we attached the furring boards. With the plastic secured, Kevin and dad held the furring boards up in position, while I drove screws through the furring, and the plastic and into the studs in the Nudura blocks. That went quite well. We definitely needed a third set of hands for that work, and since there was very little wind, it was an excellent opportunity to get that all up. My dad and I continued to work for a while, and we got some of the trim boards in place at the bottom of the wall. This would hold the plastic sheet in place, until we could get more of the furring done.

This is how we left it Saturday evening.

Today, I headed out early to get more boards cut, and drilled, so that when dad and mom were able make it out, we could get a number of boards on the wall, in a short amount of time. We finished putting the trim boards at the bottom of the wall, and we got furring boards put around the door.

Plastic sheeting well secured.

Next, we turned to battle our nemesis, the Evil Overhang! Friday night I had worked on getting the holes drilled, and tee nuts put in, for a third bolt. This provides for more support of the boards. We also had modified our plans on how the foam boards should be positioned, so that they could be installed easier. We made some adjustments to the first board, and put it in place. Then we made sure it was as level as we could get it, and secured the bolts to the joists. the next board, was trickier. It had a corner cut to go around some of the furring, and it had a hole for one of the vent pipes. It was difficult to get all the pieces to cooperate and go into place. But we manage to maneuver them where they needed to be. We thought about it some more, and made some further adjustments to the process, when we put up the third board and foam piece.

Its a start.

It now looks like we have a system that will let us work faster, and with fewer headaches. So hopefully tomorrow night and Wednesday night, we will be able to attach a majority of the foam on the underside of the overhang.