Monday, April 4, 2011

A special visitor arrives to inspect progress

This weekend started on Friday afternoon. Mom and dad came out, and we got the rest of the panels up on the front side of the house.


We also got the first part of the support for the soffit panels put up. Matt was going to be able to join us on Saturday, so we were hoping to get some good progress made on installing the soffit panels.

Saturday, we got out there fairly early, and started putting up the top trim piece on the wall. This will also provide support for the soffit material on the house wall. We got that all put up in the morning, and it was looking like a productive day.

The top Trex trim board runs just under the overhang.

After lunch we were going to start hanging the soffit panels. We got the first one out to cut it to fit, and we started thinking about all the pieces and how they would have to go together, and realized we had a couple things that were going to conflict with one another. The vent pipes, were centered roughly where the front and back panels would meet, and where they would need support installed. Hmmm, the supports would have to run right through the vents. We batted various ideas around, including cutting the panels into short pieces, and running them from front to back, rather than side to side. We burned up some good weather trying to figure that out. Another lesson. When you have good weather, and come to an impasse, take photos and measurements so you can think about the issue when the weather isn't good, and switch to working on something else that needs good weather. Then the rain showers started to come through. We didn't finish nearly as much as I had hoped.

This afternoon, mom, dad and I went out again. The weather was good. We ran string through the conduit runs that will get wires put in them for the solar and generator, and also measured the lengths, so I know how much wire to buy. We put the string in, to pull rope in at later date. The rope will be used to pull the wires through the conduits.

My niece showed up to inspect the progress on the house. She was accompanied by her parents of course. She took multiple tours of the inside, walked across the roof, and seemed to think that looking down from there was pretty neat. She also did some earth moving.

Ooh, lots of rocks and dirt to play with.

Then she sat down to a gourmet dinner (I believe it was three courses) as sunset approached. She had exclusive seating, and looked to thoroughly enjoy the ambiance of the dining experience.

Fruit, PB&J and cottage cheese.

Dad and I worked on the panels to go in the garage opening. We had to fit the end panels for the top of the garage opening so they would go where we wanted them. The end panels to go on the sides have a tapered bottom to follow the garage floor and they needed to have a cut out to match how the trim work will fit with them on the outside of the wall. This took a little while to cut, but they are now ready to have primer put on the cut edges, and then be attached to the V-Buck.

Dad is trimming the bottom, so it will follow the contour of the garage floor at the doorway.

After we got those pieces cut, we worked on the draft-blocking for the center wall. The center wall will have ducts, wiring, gas pipe, and plumbing that will need to run through it between the front and back of the house. So, I don't want to have the drywall go all the way to the roof, with holes that have to be sealed up. However, code requires that if the drywall doesn't go to the top of the wall, then draft-blocking needs to be put in. So we are putting in blocks so that the drywall only has to go up the wall most of the way, and above this, the utilities can be run through without worrying about the drywall. But the space between the studs in this wall is narrow, so that complicates trying to fasten blocks in place. Each block is being fastened with pocket screws, which allow us to put the fasteners in without having to get a tool in between the studs.


Well, it was a productive weekend. We got a lot done, but I had hoped to get further on a couple of the items than we did.

Monday, March 28, 2011

Siding continues, and sticker shock

Siding work continued last Saturday. My dad and I worked on getting the supports added for the front lights, and the outdoor outlet.

Supports and boxes for the lights, and supports for the outlet ready to be covered.

Then we put up the last two big boards. Now all that was left were the pieces for over the door, and the windows.

Just a few pieces left.

We looked over the various pieces that had been cut from the panels we had already used. We found pieces we could cut from for all the remaining locations, and we started cutting. The piece for over the front door was simple. However, the rest of them required transferring the curves from the window tops, onto the Hardie panels, and cutting the curves. That was done, by stapling large pieces of paper above the windows, and then cutting the edges to fit the space that was available. Then we traced the outline onto the Hardie panel, and cut carefully. Dad was quite skilled at using the circular saw to make a rough cut, and then smooth it up to get the fit we wanted.

This process creates a lot of dust. So we wear masks when we work with these panels. Thankfully we are just about done having to cut them. But it was a cold and dusty afternoon.

Panel to go over the guest bedroom window with the rough curve cut in it.

Temperatures outside got up to a little over freezing, but with the propane heater running inside, we had it over 60. It was quite comfortable inside. I got all the edges coated with primer, and they will be ready put up next weekend.

We also checked on a couple things while we were out there. One item was the generator. I had found after I had the generator, that the warranty was reduced from 5 years to 18 months if you don't have a reliable public utility providing your main power. If you don't have an authorized service rep do the "startup" then your warranty starts from the date of manufacture, not the date when you first put it into service, and so would be further shortened. I had read the manuals that came with the generator, and had been in touch with an "authorized service rep". The price for "starting the generator" was quite a shock (around 20% of the cost I had paid for the generator). When I initially had talked to them, I had presumed that the final connections for the gas and electric would be included in that "startup". But when I asked them how the gas piping and electrical wire should be terminated for them to do the "startup" they informed me that the gas and electrical connections had to be finished before they got there. The "startup" service call, was only a little more than them running through a checklist included with the generator and verifying that things had been done correctly. They would run some tests included in that checklist, which can't be performed by an end user without the correct equipment/software, to make sure it shutdown automatically if there was a problem. So I needed to look to see what was going to be involved in making these connections and having it ready for them to "look at". I found there will be a fair amount of time spent to get the panels inside unbolted and out of the way so that I can get to where the connections need to be made. I also found that the generator is currently configured to run on natural gas and that I will have to go through the process to switch it over to run on propane. I am finding myself wishing that I had bought a less expensive generator, since this is going to cost me more in time/dollars than I thought it would. I am thinking that buying the extra few months on my warranty is not worth what the service rep wants to charge.

On Sunday afternoon, Matt went out with me, and helped me start installing the Trex trim work. We started with the base pieces on the garage side. These pieces are along the bottom of the Hardie panel. It took longer than I had hoped, but I figured out some things as we went along. The work was slowed by the fact that I had to custom fit two sides to the rock walls, and I had to lay out the plan for the pieces before we could get started. I also need to use a different saw for making the straight cuts. The circular saw can be used, but to make a very straight and clean cut, I had to work slowly. We have used dad's power miter saw for cutting pieces at his place, and it works fast and makes very nice cuts. I think we will be hauling it out to cut the ends of the rest of the trim boards.


Thursday, March 17, 2011

Rocks, rolling, and heavy metal

Well, it has been a bit since the last post hasn't it?

Until the last week or so, the weather has been terrible on the weekends. But I did a few things. I have been looking for low power lights that will actually light up a room. I have been hoping to find LED lights that would fit the bill. While the good ones are still darn expensive, they use very little electricity (looks like between 1/6 and 1/4 of an incandescent), come on instantly (no delay like a CFL) and should last a very long time. I saw an ad for Lowe's with a new LED general lighting bulb, so I decided to pick one up and compare it to some other lights.


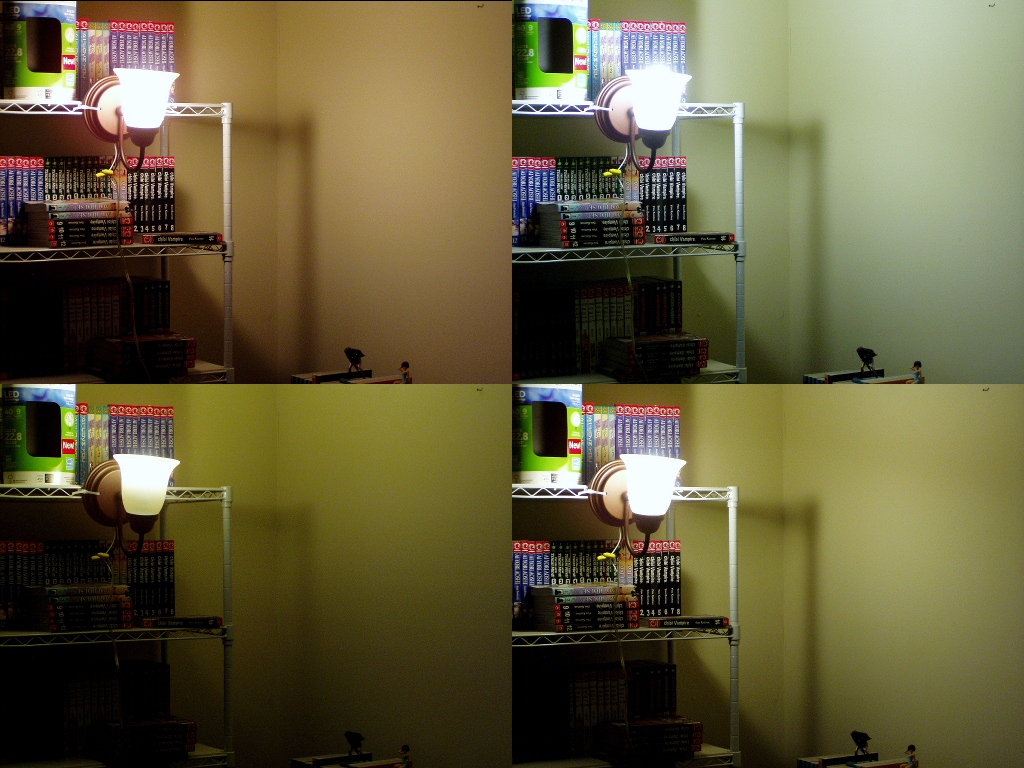
I forced my camera to take pictures with pretty much the same settings even though there were different lighting conditions so I could make a comparison.

The light in the upper left is a 40 watt incandescent. A bit red in color, but overall pleasing light. Bulb gets too hot to touch almost immediately. Most of the electricity it uses is turned into heat.

I did not have a 40 watt equivalent CFL, so I compared a 60 watt equivalent. The CFL stays much cooler, but took about 5 minutes to get up to full brightness. The light is rather harsh, and it is a little too large for this fixture, and pokes out of the top. The CFL is in the upper right.

I had a 40 equivalent LED bulb that I had bought previously. It only used about 6 watts. The light was a bit more yellow than I wanted, and it didn't light up the fixture vary evenly. So most of the light was thrown up toward the ceiling and very little was cast downwards. It came up to full brightness almost instantly, and even after a number of minutes was only a little too warm to touch comfortably. This is the one shown in the lower left.

In the lower right is the new LED bulb. I was quite pleased with it. It used about the same amount of electricity as the other LED bulb, but it put out the light in a much more even pattern, and the color was a bit better.

Three weekends ago, the weather was lousy and Dad did not feel well. So I worked on assembly work on the columns that we have been working on, and on some of the supports we will use for the electrical wires above the ceiling.


Then last weekend was looking like it was going to have very good weather for getting some outside work done. I called Adam, and he told me he could be available for helping put the generator in place, and moving dirt and gravel. We agreed that Saturday afternoon should work fine for him to come over and help. Dad and I decided to take vacation on Friday and Monday, so we would have a good long weekend to work. Thursday evening, we had snow! Obviously, this was not what I expected from an early spring. It was pretty, but I would have been happy to have had dry weather.


Well, while that melted off, we worked inside Friday morning. We worked on putting supports up in the joist space for the electrical wires, and I made notations of where I was going to change the wiring routes on my plan. Here are some of the supports up in place.


Then Saturday we headed out and started figuring out what duct work I would need for the ventilation system. Adam came over in the morning to see how things were going. He hadn't seen the place in a while, and thought we were making good progress. He said that some things had come up, and he wouldn't be available that afternoon. I told him that the ground still seemed awfully soft, so I figured if we waited till Monday, it would work out better anyway. We walked around the property and discussed the work that I wanted done. He suggested getting some landscape timbers, and making a box to pile gravel into for where the generator would sit, rather than just trying to keep gravel in place on the ground.

We got the wood for the box around the generator, and some of the duct work for the ventilation system. We cut rebar from some of what was left from forming the walls of the house, to use as spikes to hold the timbers in place.


We took the pieces of duct work into the hobby room and assembled the long pieces. I probably still have a dozen or more pieces of metal duct to get.


We also worked on getting holes cut in the two big pieces of Hardie panel left to put on the front. We needed the holes for the wiring boxes for the front lights. We started with a hole saw, then dad finished cutting them on Monday.


Sunday we did quite a bit of planning and then baby sat my niece.

Monday we got out to the property early. Dad and I started by assembling the box for the generator pad. As we were finishing that up, Adam came up the drive and dropped off the forks for his Bobcat. He went and did some grading while we finished the box. When we were done with that he came over and lifted the generator. We put pipes through holes in the base so he could lift it properly. Then when he got it over to the pad, we put out pieces of wood and he set the pipes down on the wood and helped us roll the generator into place. Then lifting one end at a time, we got the wood pulled out and set the generator down into place.


Adam got the area around the well filled in, and graded out.


The backfill around the house, had settled quite a bit. So Adam dug up more dirt from the property, and buried the house again. As Adam was working on this, we found places where the drainage material had been pulled out of place, or ripped by the settling. We took the drainage material that I had left, and patched over those areas before Adam backfilled over them. Our friend Bob wanted to see how things were going, and so he came out on Monday. We put him to work. He was a big help in getting the drainage material patches in place. These pieces were large, and needed more than two people to get them put where they needed to go.

Adam brought the east backfill back up to the roof level.

On the north side, all the water flowing off the roof, had settled the ground a lot, and also had been cutting valleys in the dirt. I decided I wanted better drainage for most of the roof, especially near the vents through the roof. So we took drain tile, and some of the gravel I had from the last load that was delivered, and put drainage material down to guide the water to where I wanted it to go. We took more drain tile, down the hill, and back into the woods.

We added drainage before Adam backfilled the north side.

Now last year, when we fixed the pipes that had broken, Adam also dug up some dirt for backfill. He dug in an area back in the woods and over the winter it has gotten a lot of water in it. I now had a pond and Adam wanted to get more dirt from back there. So he formed a nice little wall, and I had a proper looking muddy pond!

 The deer have been enjoying having this nice watering hole.

We took most of what was left of the gravel, and filled in an area around the vent and electrical pipes, and an area in front of the solar array.

It will help keep the mud from being so bad in those areas.

Adam said he is going to do some more backfill work tomorrow. I'll have to see if I can make time to stop by and check on the progress.

Tuesday, February 22, 2011

Cut, paint, hang...repeat...

Last Saturday was a good day to work on the house. We lit up the heater and spread plastic to work on painting more of the Hardie panels.

We had previously cut and painted one of the panels for the front. We got that hung, and took measurements for the next set of panels. We cut the panels, primed them, and let them dry while we went for lunch.

Priming in the dining room.

When we got back, we got more panels cut. Then we hung the ones that we had cut earlier in the day.

Here I am pre-drilling for the screws that will be used to hang the panel on the wall.

Three panels up on the front.

We have the other three large panels for the front, cut and primed. We still need to cut openings on two of them for the lights next to the front door, and the outside outlet. The weather forecast isn't looking too good for the rest of this week though, so I am not sure if that will happen this weekend. Trimming the panels for over the windows will present its own set of challenges. Cutting the curves in this stuff could be very slow work. Not that cutting straight lines in it is a piece of cake, but... Well, we shall see.

Monday, February 14, 2011

We have it covered!

It was a productive weekend. On Saturday, we worked in Dad's garage, and fabricated more supports for the electrical and plumbing. We tested out a new purchase of mine.

This can heat things up in a hurry!

Since it has been darn cold, it has limited work on certain things. The Hardie panels are supposed to have primer applied to cut edges, however the primer requires temperatures in the 50's to dry properly. I have not been able to make progress on the siding, since even being mostly buried, my house can't maintain that sort of temperature when it is getting into single digits overnight. Since we can't be out there for an extended period of time, I needed something that could heat up at least part of the house, faster than the radiant heater could manage. This heater shouldn't be operated in a house as well sealed as mine. We took a carbon monoxide detector out with us to make sure we knew if we should shut it down and open the doors. We tested it in dad's garage. Within an hour it had taken the temperature up from 41F to over 72F (i.e. from needing a coat to work comfortably, to room temperature). We worked out there and turned it back on occasionally as the temperature got cool again.

We cut wood and drilled pieces to act as supports for the wiring and plumbing lines that will be up in the joists. We cut more pieces for the columns. Then we turned to the detail pieces that will go behind the lights on the garage wall. These will serve a couple purposes. First I think they will look nice. Second, they will provide more space for wiring behind the lights. We had picked up some pieces of Trex and brought them back to dads garage. We discussed the design and started cutting. We started cutting holes in the pieces to accommodate the electrical boxes. Then the blade on the saw broke. The rest of those blades were out at my house. Hmmm, how to finish the holes. Well, we have this bit that is making good sized holes pretty fast, mounted in the drill press. Lets start there. Then we took dad's router, and finished up the openings. Here you can see where we were part way done, and needed to still finish up the holes with the router.

First pass with the router gave a clean edge, then we needed to use that edge as a guide, and finish the holes.

We used the router to put a nice detail around the edges instead of having the square edges. They were ready to mount on the wall.

Sunday, we got up early, loaded up the truck, and headed out. We got the heater set up and running. Then we looked over the roof leak. The temporary drain was working somewhat. We dumped water that had missed the drain and collected in the buckets, then we got the Hardie panel set up so I could paint the edges with the primer. The heater warmed up the house to a sufficient temperature in a fairly short time. We needed holes for the gas line, hydrogen vent, and water heater air intake, cut into the last Hardie panel. We checked out the hole in the wall where these pipes would come out. We took measurements, then we marked the panel. Then we put the panel up into the correct position, and I checked that the holes would line up with where we wanted the pipes. That was good, so we cut the holes i the panel. I bought a hole saw designed to cut through masonry. It worked very well. I painted all the cut edges on the panel, and dad took some measurements of walls we needed. Things were proceeding fairly well.

After lunch, I positioned the powered scaffold. In other words, dad directed me as I backed the truck up to the house so we could stand in the bed of the truck and work at least for the ones side. We first had to cut an opening for the wire to come out to the light fixture. In some of these pictures you may be able to see where we marked out where we were going to cut and drill on the Hardie panel. We used pencil, but the nice thing is with a Trex board covering the area, we didn't have to be real worried about the marks, as they would all be covered.

Dad stood on the tailgate, and cut the hole for the wire, then drilled pilot holes for where we would mount the electrical box.

 We fished the wire up and through the hole. 

Here dad is mounting the electrical box. We have very little depth to work with.

Hopefully the inspector will approve of the protection we put on the electrical wire. We didn't have room to put a normal clamp in place to protect the wires, so we added a piece of sheathing from wire that goes down the well to protect the wire from the edges of the box.

Fishing the wires up behind the panels that were already installed, was an aggravation. But we managed.

 A better view of the Trex plate. We put some blocks in so that the wire didn't dangle down like you see here.
 
Now the last panel has been attached on the garage side.

Next on the garage side, we will probably work on the trim and gaskets around the garage door. We will need to run the pipes out through the holes in the panel on the left, but this side can be left this way for a while. We will probably try to concentrate on getting the siding up on the front now. The weather seems to be giving us a break for now, so we are going to get as much done outside while it lasts.

Monday, February 7, 2011

Slloowww Progress

Well, the weather has continued to present challenges. Snow, ice, mud. That has been the state of the ground since the beginning of December. Between that, and a project at work that has been requiring a lot of attention, progress has been limited.

This last weekend, my dad and I got up, and headed to the property, before the storm got bad. As it turns out, it never got very bad, but we had some snow while we were out there.


In December I had found that I had a leak in the roof, around the roof box. So that needs to be fixed before things like drywall, and other materials can be installed. Well, with almost continually wet conditions on the roof, it has not been possible to fix the leak. I decided that to mitigate the amount of water that came in, I would put a tarp over the area that I thought was causing water to back up the roof and cause a problem. That seems to have helped some. I was still having some water come in, and so my dad came up with a way to hopefully catch most of what comes in. Put a funnel under where it is dripping and drain it over to the clothes washer drain. This last weekend we went out and put that in place.


Up in the joists is a plastic bottle with the bottom cut off to serve as a drip catcher. Then we cut pieces of PVC that will eventually be getting used for the radon vent, and just press fit them together. Then we used bungee cords, a piece of wood, and some wire ties to hold it together. Hopefully this will direct most of what leaks in, down to the septic tank. The garbage bag and the bucket had served to catch quite a bit of what leaked in in the past.

We have been working on getting the one door going into the garage installed. The one with the wrong way door. We needed to extend the floor out from the hallway a bit so the bottom of the door frame could be placed properly. We found a piece of Trex that had been cut and trimmed already. We found that it was pretty close to exactly what we needed. We notched the ends of the furring we were adding to the studs so that it fit well with the Trex. We glued the Trex to the concrete, and then needed to hold it in place while the glue set over the next day. Hmmm, how do you put a clamp over a corner and have it hold the board in place against the concrete? You don't, you need to put a brace in place between something that it can push against, and the board you want to hold in place. We found some long boards, and some shorter boards, and using a couple clamps, we wedged the boards in between the garage wall opposite the place where we needed to hold the Trex board in place, and the Trex board.


We added a second "clamp" and a board at each end to spread out the force.

While we have not been able to do that much out at the house, we have been doing a lot of planning, and fabricating in dad's garage. For supporting the electrical and plumbing runs up in the joist space, we needed to fabricate something that would hold wires and pex tubing in place, but be easy to put into place in the joist space. We came up with designs for a couple different holders, dependent upon if the wire and tubing were running parallel to or across the joists. We started manufacturing the supports to hold wires and tube running across the joists.

Each board that will hold the wire and tubes, needs blocks attached that will hold it in the space in the bars of the joist.

I don't know yet how many I will need, but I will need more than this. This is just a start.


After we had the blocks on, then we needed to put holes in the board where wires could be run though.

We made good use of the drill press again when we bored the holes in all the boards.

Another item that we have been working out the design on, is the columns that will hold lights and outlets on the outside walls. I did not want to cut into the insulating foam, and so I have places where we need to bring wire down the wall to an outlet or light. To do this, with a little more style and class than a chunk of metal conduit, we are making hollow columns. They will house the outlets, and wiring for the outlets, lights, and in the family room they will have speakers mounted on them as well. Dad and I had worked on a few different designs for the columns, and we had finally arrived at a design that looked good. We got pieces cut, and dad got most of the structure of the first one done. Then this weekend we put together the structure for the second one, and got the electrical boxes attached for the lights. We still need to attach the other electrical boxes, and fabricate the materials that will go on the outside of the column.

Dad attaching the back to the blocks.

The first column standing up. It still needs the other electrical boxes attached, and an outside shell. The columns are eight feet tall.

As for the plan for this week? I don't know, a lot depends on what the weather decides to do. That is as predictable as ever!

Sunday, January 9, 2011

Battling cobra conductors, and wrong way doors

Well, I better post before certain people start to complain :-)

December, I did planning, and made some purchases. But between a big project at work, the holidays, and weather that was not in a cooperative mood, the house did not progress much. It also didn't help that the daylight hours just kept getting shorter. I actually took some vacation time, and did some planning and bought materials for working on some of the duct work. I ordered my generator, which was available in about a week. Just in time for us to get hit with a good snowfall. The house looked pretty.

Buried in a winter coat

However, I was not going to ask them to even attempt a delivery with that much snow. I was using four wheel drive to get to my driveway. They were not going to be able to make a delivery. So we postponed it.

I ran the little propane heater, and it certainly warmed things up in the house, but not warm enough for me to put the primer on the edges of the Hardie panel. This weekend, mom and dad went out there with me on Saturday, and we tried to warm things up better. We weren't going to be able to get the whole house warmed up enough, but dad thought we could wall off one room, and get that warmer. We hung plastic on the family room walls, and ran the heater and some lights in there.


The heater unfortunately was not cooperating and kept going out. So while we were able to raise the temperature a few degrees while we were out there, it wasn't able to get it up to a temperature where I could put on the primer.


While we were out there, we did inside things, because it was pretty cold outside, and the wind chill was nasty. We had plenty of things to work on. We unpacked one of the doors that will lead from the house into the garage. We wanted to see what we would need to get to install it, and just to double check that it would fit in the framed opening. We opened it up, and moved it over to the opening. It would fit, but the door was going to swing the wrong way! It was either going to swing into the hallway, and would run into things I planned to have in the hall, or it would swing into the garage, and swing away from the adjacent wall. We looked at it, and decided that we would simply have to have it swing out into the garage the opposite way from what I had intended. With the built in threshold, it will work better that way. With the insulation on the wall, we needed to add some furring to the studs by the door, so that the finish trim work could be done properly down the road. We found some pieces that were already about right. Then we needed to add a piece of material under the garage side of the door frame, so it would sit in the opening properly. We found a scrap of Trex that was very close to being just right, and trimmed it so it would fit the slope of the floor, and come right up under the threshold. With that, all the pieces are ready for the install. We just needed shims, and some adhesive. We may get to install the door next weekend.

I had pieces sitting around for parts of the duct work for exhausting air from the bathrooms, and for the house ventilation. So we worked on some of that stuff. Some of this stuff is rather bulky, and while it can be installed by one person, it works better to have at least two to wrangle it. As we were working on installing the big insulated ducts for the house exhaust, my dad thought of snakes, and was reminded of a term that someone we know used to use. Dad called the ducts cobra conductors. I remembered immediately some long ago dinner time discussions. We both got a chuckle from the memory, then went back to subduing the ducts.

Fishing the flexible duct up between the joists.

These will take stale air from in the house, and vent it outside.

We were going to use pieces of strapping material that I had bought, to support these ducts, but we found that using scraps of wood that we had laying around, worked very conveniently. So I will keep the strap material for other duct work. A number of the pieces of wood had been used to hold the tarps on the roof last year, and now have been moved inside, to hold the ducts up in place.

Today, we worked on cutting pieces of lumber for the supports that will go in the joists to support the electrical wiring, and plumbing lines.