Ah, dry weather. I have been in need of it, and it has been in short supply the last few months. But we finally have a dry spell, so I am making the most use of it. I wanted to get the overhang done. Last Friday, we got the first T-bar section put up between the Hardie soffit panels. It worked quite well.
We got that put in place, and did some planning. I also moved dirt bags out of the way around the roof box, and got the drainage material peeled back from around it, to see what things looked like, and to try to let it dry some before we started trying to seal it up. We also removed a wasp nest being built on the gasket around my front door.
Saturday, we worked on yard maintenance at my parents house. They have also been struggling to find times when it is dry enough to take care of outside work, and some of that time has been taken up because they have been helping me. The lawn needed mowing, there were weeds to remove, a dead spruce tree to take down. Lots of work. It was a full day.
Sunday afternoon roofbox day1, we did some more thinking about the roofbox situation, and went and bought some of the materials we would need that we didn't already have on hand. We painted a test area with a waterproofing material a little bit away from the roofbox, to see how it would stick to the plastic sheeting. With Matt out there, we also layed down the tapes that would go directly on the plastic sheeting. Having three sets of hands to manage these larger pieces was important.
Monday was roofbox day2.
The waterproofing material we had painted on, was sticking, but not that well. We just needed to be careful around it until it gets covered. We put down various tapes with a tar like backing. We used these to get the aluminum flashing around the roofbox, adhered to the plastic sheeting.
There were round pieces of EPDM (a rubber like material) that we put in the corners to reinforce the waterproofing there. We also put flashing sealant (gray gooey stuff) on the various seams to try to make sure that even where we had wrinkles in materials, the gaps were filled.
Then we painted on the waterproofing material.
After the waterproofing had dried a while, I climbed out around the box, and put flashing sealant on the places that looked to have gaps between the tapes, and the plastic sheeting, where the waterproofing paint, had not filled in.
Dad and I opened up the generator housing, to see how difficult it would be to get the electrical lines in. I think the inside of the generator cabinet was designed by the engineers that figure out how they can stuff all the equipment you need, in your car's undersized engine compartment. I am still not sure how you get to some things, but we managed to get to the places we need to, to run the electrical in. We also had to remove two wasp nests which were being built inside the generator housing.
Dad and I worked on getting more of the panels up under the overhang. We finished installing the row that is closest to the house.
On a different note, one of the plants that I have growing wild, is wild rose. They are blooming right now, and it will be nice when I can take the time to manage the plants around them a bit, so they really get to show off.

Various plants are populating the fill around the house now, and the south slopes are growing quite well.
Oh, and the wasps were at the front door again.
We went to dinner with some friends, but dad and I wanted to clean up some first. In the morning we had put out a tub in the sun, with a black garbage bag filled with water from my well in it. By evening, the water was nice and hot. We set up at the back of the truck, and washed up.
Tuesday, roofbox day3. I went out at lunch and trimmed the edges of the drainage material to come to where I wanted them, and put in foam blocks we had cut, to make the drainage material have an upward slope leading to the box, except on the downhill side of the box.
Marcus had recommended putting tape over the uphill flap, to prevent water gushing down the roof, and spurting out and pushing up under the flashing. That is the silver tape you see on the flap on the short side of the box in the picture above.
For now, I just put bags back in place to cover the seams between the pieces of drainage material. I didn't want to cover the whole area, in case I find I still need to fix something, but I wanted to make sure the wind wouldn't pull the materials up.
I came back out at the end of the day, and worked some more on the vent drain trench. Then I started to haul some dirt up on the roof, and dumped it on the top of the south berms to fill in where the fill has settled. I used my hoist in the garage to load my generator in the truck, and took it to where it was close enough to my fill dirt pile, that I could power the cultivator. I wanted to get the dirt broken up, so it would dump easily, and fill in between the plants that are already growing. My hope is that doing it this way, will help keep the dirt on the berms, rather than having it just role down them with the first rain.
I am hoping this weekend we can get close to finishing the overhang.
Thursday, June 2, 2011
Wednesday, May 25, 2011
Garage side finished!
Although the landscaping is not by design (yet), the rain has helped things grow, and is helping give a better impression of how the house will look when it is finished.
Something else that the weather has brought about, is a strange effect on some of the dirt around the front of the house. I think this is caused by the layers of mud that have been deposited from the dirt washing down the slopes behind the retaining wall, but I am not sure.
The rain has also provided plenty of places for mosquitoes to breed. My truck is a bug whacker!
Ok, back to construction...
Now that we had the garage sealed, I wanted to finish the rest of the details on the garage side. So during the week, I dodged rain storms, and worked on getting the trim pieces cut and fit. The pieces to go next to the retaining walls took some time to craft, but I am pleased with the results.
Last Friday night, we finished the garage side. I couldn't get a good picture till Saturday.
It came out pretty close to my model:
Saturday, we spent the day working on the soffit under the overhang. We were still working out a couple details of the install as we went. We had ideas in our head of what we wanted to do, but sometimes until you try something, you just don't see the subtle issues you will encounter.
Panel A1 in place, notice the Trex blocks it isn't covering which were supposed to be used to attach panel B1?
Those blocks got removed, and were replaced by foam spacers, with longer screws going through them, and attaching into the Trex board that is hung directly on the joist. With the Trex blocks, the edges of the panels didn't meet at the same height, and I was worried about the corner of the Trex block putting strain on the front panel as it got attached, and the screws tried to bend it as they pulled it into place.
We got a few of the boards up on Saturday, and tested our ideas for the T-bar to go between the A and B panels to cover the gap, and provide additional support to the Hardie soffit boards.
As we got things cleaned up, I notices that someone had tried the front door, but found they couldn't open it.
We also worked on getting a trench dug from the pit where the vent pipes end, out to a daylight drain. We got down to where water that is in the pipes, and the gravel around them, started flowing out. But we didn't get the trench finished yet. That work will have to continue as weather permits. Matt was available on Sunday to help, and we went out with the intention of getting more of the soffit boards up on the overhang, and getting the first pieces of the T-bar fit and installed. However, the weather did not cooperate, and we ended up working on various items inside. We still needed the generator running to do the work, so we came up with a rain shield for the generator. We had trouble with water getting in the gas tank the last time we had the generator out in the rain, so we knew we needed to keep it from getting rained on. But what to use with the wind blowing, and the rain pouring down. Well, I am not currently using the storage shed I had bought, so...
It worked well, and we were able to have lights, and power tools.
Weather permitting, next weekend, the overhang saga will continue.
Something else that the weather has brought about, is a strange effect on some of the dirt around the front of the house. I think this is caused by the layers of mud that have been deposited from the dirt washing down the slopes behind the retaining wall, but I am not sure.
The rain has also provided plenty of places for mosquitoes to breed. My truck is a bug whacker!
Ok, back to construction...
Now that we had the garage sealed, I wanted to finish the rest of the details on the garage side. So during the week, I dodged rain storms, and worked on getting the trim pieces cut and fit. The pieces to go next to the retaining walls took some time to craft, but I am pleased with the results.
South retaining wall trim in place.
North retaining wall trim ready to install.
Last Friday night, we finished the garage side. I couldn't get a good picture till Saturday.
It came out pretty close to my model:
Saturday, we spent the day working on the soffit under the overhang. We were still working out a couple details of the install as we went. We had ideas in our head of what we wanted to do, but sometimes until you try something, you just don't see the subtle issues you will encounter.
Panel A1 in place, notice the Trex blocks it isn't covering which were supposed to be used to attach panel B1?
Those blocks got removed, and were replaced by foam spacers, with longer screws going through them, and attaching into the Trex board that is hung directly on the joist. With the Trex blocks, the edges of the panels didn't meet at the same height, and I was worried about the corner of the Trex block putting strain on the front panel as it got attached, and the screws tried to bend it as they pulled it into place.
We got a few of the boards up on Saturday, and tested our ideas for the T-bar to go between the A and B panels to cover the gap, and provide additional support to the Hardie soffit boards.
As we got things cleaned up, I notices that someone had tried the front door, but found they couldn't open it.
Maybe this was the inspector who check on things last year before the doors were on.
We also worked on getting a trench dug from the pit where the vent pipes end, out to a daylight drain. We got down to where water that is in the pipes, and the gravel around them, started flowing out. But we didn't get the trench finished yet. That work will have to continue as weather permits. Matt was available on Sunday to help, and we went out with the intention of getting more of the soffit boards up on the overhang, and getting the first pieces of the T-bar fit and installed. However, the weather did not cooperate, and we ended up working on various items inside. We still needed the generator running to do the work, so we came up with a rain shield for the generator. We had trouble with water getting in the gas tank the last time we had the generator out in the rain, so we knew we needed to keep it from getting rained on. But what to use with the wind blowing, and the rain pouring down. Well, I am not currently using the storage shed I had bought, so...
It worked well, and we were able to have lights, and power tools.
Weather permitting, next weekend, the overhang saga will continue.
Sunday, May 15, 2011
Sealing the garage
We finally got the garage sealed up. Here are some pictures from the last couple weeks.
Here we attached Trex to the header over the garage door, and we are attaching the Hardie soffit to it, and the V-buck.Matt helped us get the 12 foot long piece of Hardie soffit up in the middle. It was a challenge.
First side, and most of the top on the garage opening.
The following evening, we got the rest of the soffit material installed on top, and the siding on the left side.
I wanted to make sure that that any water that came down from the roof on the plastic, didn't go under the soffit material. So I used caulk, and put a strip of flashing tape up along the top edge of the garage opening. I also installed screening to keep insects from climbing up in, and making nests. Then we added more blocks to hold the screen, and hold the wire in place.
Then we had a Saturday with good weather. We cut the remaining siding sheets to rough size for going on the front of the overhang. We didn't take time to install them, but I wanted to get them cut into smaller pieces that I could move out of my way as I work in the house.
We also cut the soffit pieces for under the overhang. We just got them cut to the correct length.
Then it was back to working on the garage side. The top was still going to need to have material added to put the gasket down into the correct height range. The outside corners on the garage, were going to need some thin pieces of Trex to give them a finished look. So we took one Trex board, and made all four pieces. Two thin pieces to go on the top, and two thin pieces for the corners.
Trim on the corners, but stil need to put on the gaskets, and more trim work.
The next time I went out, I did a couple things. I pumped the well again in preparation for the health department testing the water. I checked that my truck would actually fit under the garage door. I had measured, but some doubted it. I also cut some more of the trim boards, and put the first piece in place over the garage door.
Then with dad's help, we got the gaskets on, and the other pieces put up over the garage. Just a few trim boards left, and the garage outside will be done!
Here we attached Trex to the header over the garage door, and we are attaching the Hardie soffit to it, and the V-buck.Matt helped us get the 12 foot long piece of Hardie soffit up in the middle. It was a challenge.
First side, and most of the top on the garage opening.
The following evening, we got the rest of the soffit material installed on top, and the siding on the left side.
I wanted to make sure that that any water that came down from the roof on the plastic, didn't go under the soffit material. So I used caulk, and put a strip of flashing tape up along the top edge of the garage opening. I also installed screening to keep insects from climbing up in, and making nests. Then we added more blocks to hold the screen, and hold the wire in place.
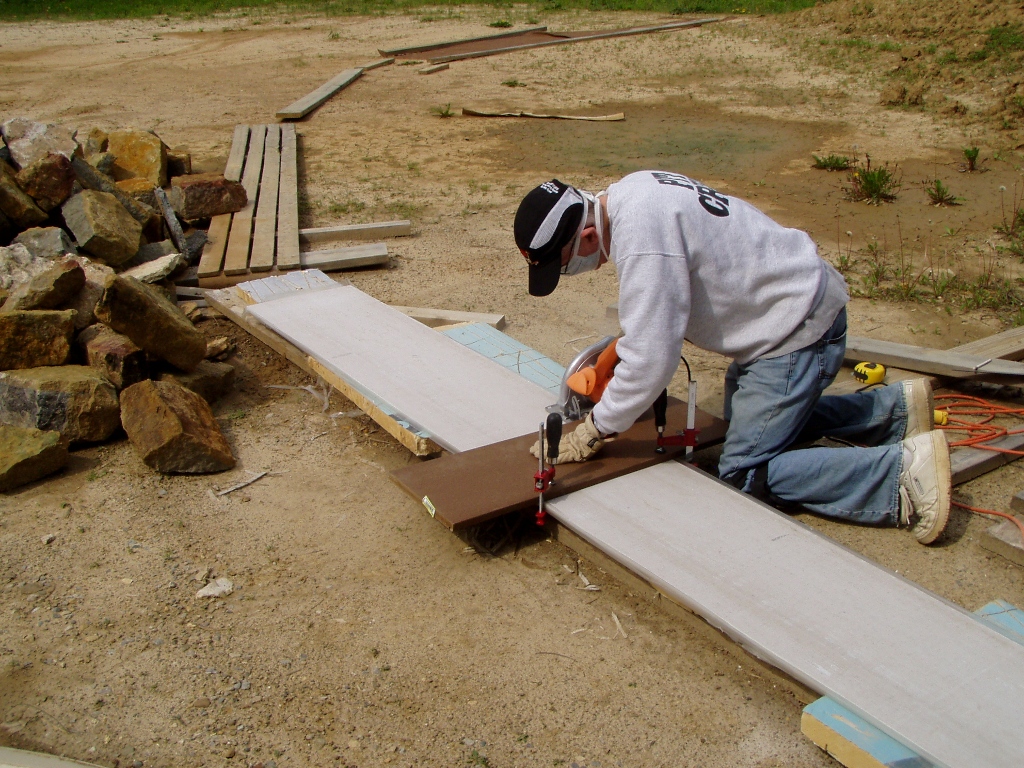
Then we had a Saturday with good weather. We cut the remaining siding sheets to rough size for going on the front of the overhang. We didn't take time to install them, but I wanted to get them cut into smaller pieces that I could move out of my way as I work in the house.
We also cut the soffit pieces for under the overhang. We just got them cut to the correct length.
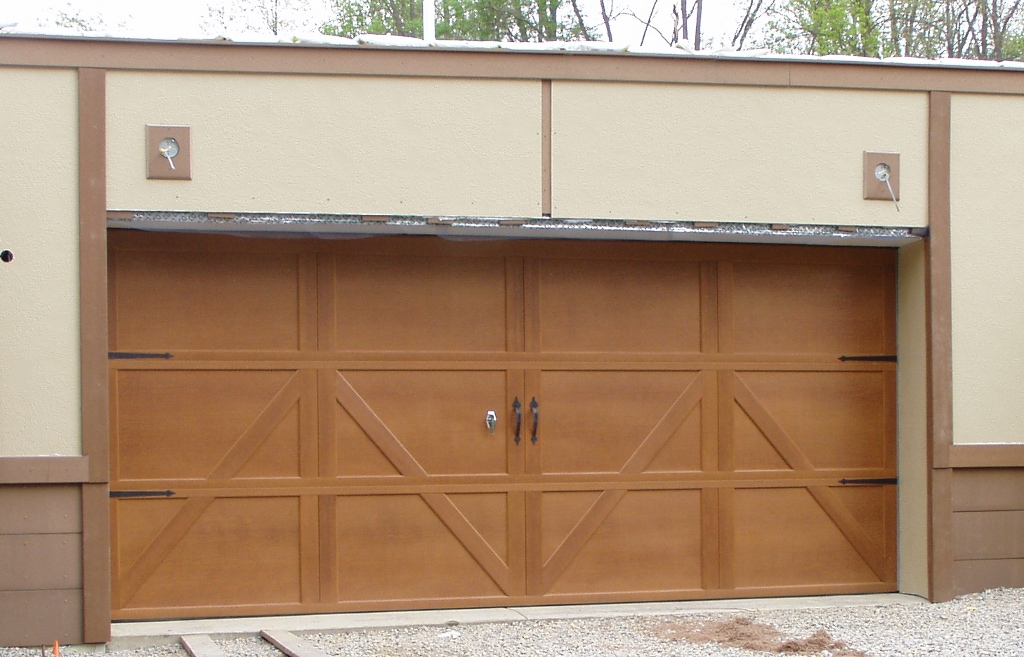
Then it was back to working on the garage side. The top was still going to need to have material added to put the gasket down into the correct height range. The outside corners on the garage, were going to need some thin pieces of Trex to give them a finished look. So we took one Trex board, and made all four pieces. Two thin pieces to go on the top, and two thin pieces for the corners.
Trim on the corners, but stil need to put on the gaskets, and more trim work.
The next time I went out, I did a couple things. I pumped the well again in preparation for the health department testing the water. I checked that my truck would actually fit under the garage door. I had measured, but some doubted it. I also cut some more of the trim boards, and put the first piece in place over the garage door.
Then with dad's help, we got the gaskets on, and the other pieces put up over the garage. Just a few trim boards left, and the garage outside will be done!
Monday, May 2, 2011
Opening doors
So after the last adventure, it seemed the sky decided to open up (even more than it had been) this has been really hampering construction. I had checked with the county about well testing, since my well permit extension was going to be expiring soon, and I am no where near ready to put in a sink and take water from that for testing. They told me that they could take a sample straight from the well line in the house, and that depending on an upcoming vote, the standard process may change to getting a sample from the well line rather than a faucet anyway. Ok, so time to sanitize the well and get a test arranged. Then the sky opened on me and we had days of rain. This last weekend though, we had a break in the weather. Last Friday I poured a half gallon of bleach down the well and let it sit overnight. The well driller had put bleach in the well when he originally drilled the well, but I figured the pump, wire and pipe hadn't been sanitized before they were put in, so best to be thorough. Then Saturday afternoon I started pumping. When we left Saturday evening, the water still had a significant chlorine taste. So I will need to pump some more before I have it tested. The purpose of the bleach is just to kill off anything that has been introduced into the well. If I have a contamination problem, a dose of bleach won't fix that.
While contemplating the weather that has got my father looking for classes in ark construction, I started thinking about a garage opener. I thought it would be handy to be able to show up out there, and open the garage door, and not have to slog through mud to get to the front door, when the weather is like this. However, until I have power, a garage door opener wasn't going to function. Then I thought about it some more, and I wondered, will a garage door opener even work properly with a steel and concrete house surrounding it? Would the remote in the truck, be able to trigger the opener from the outside?
Paying a good amount of money for something I suspected might not work correctly, and having to spend significant time and/or money to have it installed wasn't a thought I liked. Besides, it wouldn't do me much good until the house was much further along. I thought about just a garage door lock. The door is big, but it is properly balanced, and isn't too difficult to open or close. A lock would cost less, could be used as soon as I installed it, and would take less time to install. I picked up a "universal" lock kit from Lowe's and decided that installing it, would be one of the things to concentrate on this last weekend. I took Friday afternoon off, and went out with my mom and dad, and besides sanitizing the well, we looked over the garage door lock to see what might not be included in the "universal" kit.
Looking things over, there were two issues. One, the bracket that was included to hold the lock in place, did not look to be designed to fit on a flat garage door panel. Second, we did not see any fasteners, or instructions on fastening the bracket to the garage door other than some two sided tape. They had you mount the lock onto the bracket, but the bracket was not going to be fastened to the door? That didn't seem right. We figured out that we had some plywood scraps, which were left from the boards we cut to provide baseboard support, that would fit very well between the garage door panel, and the ends on this bracket. We needed the right screws though to fasten the plywood to the door, and the bracket to the plywood and door. The rest of the instructions looked pretty straight forward. So we left the garage lock install for Saturday.
We tried hanging some of the ventilation duct inside. We were going to use plumbing strap and fasten it to the joists. We found that working with the plumbing strap was a challenge and didn't give us the results we were looking for. It held the duct, but running from joist to joist, and around the duct resulted in multiple twists, and it just wasn't going look very good. We decided that for hanging between the joists, we would try using wire that is used for suspended ceilings. The duct isn't heavy, and the wire should provide plenty of support. I will have to try it out.
We looked over the overhang situation again, and the garage opening. I think we have worked out the approach for both. To provide additional support to the Hardie soffit boards on the overhang, we are going to use suspended ceiling bars. The ones I am looking at, are galvanized so they should hold up pretty well. The bottom side that will show, is already painted white. I can get them in fairly short lengths, that will be easy to work with. They will have to be cut to fit around the Trex boards, but this looks like a good way to go. We took measurements between the Trex boards, so I can work out a plan for how many supports I need, and where I will need to cut them. I will do the cutting out at the house, so I can mark them right from where the Trex boards are.
For the garage opening, we thought about different fasteners to use, and I tried some wall anchors to see how they would hold. In the end after some test using scraps of Trex, Hardie panel, and V-Buck, we came to the conclusion that we would just put a lot more screws in than would be normal, rather than trying to go with the anchors. The plan for attaching the Hardie panel around the garage opening is rather complicated. I am not going to try to describe it, I will just take a bunch of pictures when we do it.
So, what did we do on Saturday you ask. Well first we hooked up the well pump to the truck's battery. We had a garden hose attached to the well line to extend it and we put it out through one of the holes in the garage wall. I knew we would need to put the door up and down, and didn't want the hose in the way. The electrical wire had to run under the garage door, but it is flat, so it wasn't a problem. Putting the generator outside and running it all afternoon so we would have light to work in the garage with the door down, was not a sensible idea. So we got the lantern out, and lit it.
As I said, I was going to secure the bracket to the garage door, and that is what we did.
Bright chrome finish next to the wrought iron type finish on the handles isn't the best, but being able to go into the garage when it is messy out, rather than tracking mud in through the front door, should be very nice.
As evening came, dad and I went back to check on the ponds that have formed where Adam dug out fill dirt. As we got around to the north side of the house and were looking at deer prints next to the roof, we spotted three deer in the field next door. We spooked them and they went bounding through the weeds for a ways, before they stopped and looked back at us. They looked at as for a bit, then went on up through the field. There were a number of prints back by the ponds where they had been drinking I am sure.
This week I am hoping that despite the rain predictions we will be able to start getting the siding up on the garage opening. With the siding and gaskets in place, I should be able to go out and stay overnight with minimal concern for what might crawl in and visit me overnight.
While contemplating the weather that has got my father looking for classes in ark construction, I started thinking about a garage opener. I thought it would be handy to be able to show up out there, and open the garage door, and not have to slog through mud to get to the front door, when the weather is like this. However, until I have power, a garage door opener wasn't going to function. Then I thought about it some more, and I wondered, will a garage door opener even work properly with a steel and concrete house surrounding it? Would the remote in the truck, be able to trigger the opener from the outside?
Paying a good amount of money for something I suspected might not work correctly, and having to spend significant time and/or money to have it installed wasn't a thought I liked. Besides, it wouldn't do me much good until the house was much further along. I thought about just a garage door lock. The door is big, but it is properly balanced, and isn't too difficult to open or close. A lock would cost less, could be used as soon as I installed it, and would take less time to install. I picked up a "universal" lock kit from Lowe's and decided that installing it, would be one of the things to concentrate on this last weekend. I took Friday afternoon off, and went out with my mom and dad, and besides sanitizing the well, we looked over the garage door lock to see what might not be included in the "universal" kit.
Looking things over, there were two issues. One, the bracket that was included to hold the lock in place, did not look to be designed to fit on a flat garage door panel. Second, we did not see any fasteners, or instructions on fastening the bracket to the garage door other than some two sided tape. They had you mount the lock onto the bracket, but the bracket was not going to be fastened to the door? That didn't seem right. We figured out that we had some plywood scraps, which were left from the boards we cut to provide baseboard support, that would fit very well between the garage door panel, and the ends on this bracket. We needed the right screws though to fasten the plywood to the door, and the bracket to the plywood and door. The rest of the instructions looked pretty straight forward. So we left the garage lock install for Saturday.
We tried hanging some of the ventilation duct inside. We were going to use plumbing strap and fasten it to the joists. We found that working with the plumbing strap was a challenge and didn't give us the results we were looking for. It held the duct, but running from joist to joist, and around the duct resulted in multiple twists, and it just wasn't going look very good. We decided that for hanging between the joists, we would try using wire that is used for suspended ceilings. The duct isn't heavy, and the wire should provide plenty of support. I will have to try it out.
We looked over the overhang situation again, and the garage opening. I think we have worked out the approach for both. To provide additional support to the Hardie soffit boards on the overhang, we are going to use suspended ceiling bars. The ones I am looking at, are galvanized so they should hold up pretty well. The bottom side that will show, is already painted white. I can get them in fairly short lengths, that will be easy to work with. They will have to be cut to fit around the Trex boards, but this looks like a good way to go. We took measurements between the Trex boards, so I can work out a plan for how many supports I need, and where I will need to cut them. I will do the cutting out at the house, so I can mark them right from where the Trex boards are.
For the garage opening, we thought about different fasteners to use, and I tried some wall anchors to see how they would hold. In the end after some test using scraps of Trex, Hardie panel, and V-Buck, we came to the conclusion that we would just put a lot more screws in than would be normal, rather than trying to go with the anchors. The plan for attaching the Hardie panel around the garage opening is rather complicated. I am not going to try to describe it, I will just take a bunch of pictures when we do it.
So, what did we do on Saturday you ask. Well first we hooked up the well pump to the truck's battery. We had a garden hose attached to the well line to extend it and we put it out through one of the holes in the garage wall. I knew we would need to put the door up and down, and didn't want the hose in the way. The electrical wire had to run under the garage door, but it is flat, so it wasn't a problem. Putting the generator outside and running it all afternoon so we would have light to work in the garage with the door down, was not a sensible idea. So we got the lantern out, and lit it.
Hose going up the garage wall and out, wire going up to truck battery, Coleman Lantern providing light for when we had to close the door, dad checking the instructions.
As I said, I was going to secure the bracket to the garage door, and that is what we did.
Plywood strips to provide good anchoring to the door.
Outside with the lock next to the handles.
Bright chrome finish next to the wrought iron type finish on the handles isn't the best, but being able to go into the garage when it is messy out, rather than tracking mud in through the front door, should be very nice.
As evening came, dad and I went back to check on the ponds that have formed where Adam dug out fill dirt. As we got around to the north side of the house and were looking at deer prints next to the roof, we spotted three deer in the field next door. We spooked them and they went bounding through the weeds for a ways, before they stopped and looked back at us. They looked at as for a bit, then went on up through the field. There were a number of prints back by the ponds where they had been drinking I am sure.
This week I am hoping that despite the rain predictions we will be able to start getting the siding up on the garage opening. With the siding and gaskets in place, I should be able to go out and stay overnight with minimal concern for what might crawl in and visit me overnight.
Monday, April 18, 2011
That's not a weed, that's my lawn!
I have been having some trouble with the dirt washing out from behind the retaining walls. The retaining walls are not as long as I wanted them, so the dirt has to come down at a steeper slope than it should. I had talked to Adam the last time he was over, about how I might go about extending the bottoms of the retaining walls out further from the house. We discussed different options for extending them.
Last week, I still hadn't found the time to contact anyone about getting timbers, railroad ties, or rock to add to the end of the walls. All options that Adam and I discussed. Adam called me up last Wednesday, and told me he was doing some clearing work for the person who had sold me the property originally, and had some rock that I might be interested in. The old farm house on her property had burned to the ground, and she had built a new house. The old fireplaces were still standing, and she wanted to get them out of the middle of her lawn. They were made of stone, and brick. She had asked Adam to just push the rocks back into her woods. He called me up to see if I would like them for my retaining walls. I went out and took a look at them, and then Adam and I looked over my situation again. I told him I would take it all, and would find uses for the rocks and the bricks.
Last Thursday night, I had a new delivery of materials.
I haven't decided for sure how the bricks will be used.
Last weekend we only got a few hours out at the house on Sunday, but Matt was able to join us. That helped us get work done faster. We cut sheets of plywood into 3" wide strips to go at the bottom of the walls. This is an odd item. The ICF blocks won't hold nails, so if you want to put in baseboards, you either have to attach the baseboards with screws or you have to attach wood to the ICF with screws, and then nail the baseboards to the wood. We decided that adding a strip of plywood at the bottom of the walls, and then nailing into that would work best. Dad cut the sheets in half first with the circular saw, then we ran each piece through the table saw to make pieces just a little less than 3" wide. I am going to work on attaching those to the ICF walls since that is a pretty easy one man job. We also rough cut more 2x6 for the center wall draft blocks. Dad and Matt worked on cutting them, and I placed them next to the wall, so they are handy when we get to work on putting them in.
We were going to work on finishing the garage opening, but after we started looking at it, we realized there were still some things to think about before we start attaching materials. The top of the garage door is down below the top of the opening, when it is closed. So we need to put in some material to lower the top gasket so it meets the door at the correct place. We got an idea of the situation so we can think about the options, and then we switched to another task.
With three of us there and nice weather, I decided to do some work on the trim boards. A number of the boards are too cumbersome for one or two people to install very effectively. So while we still had light, we cut the longer base pieces for the front, and got them installed.
Tonight the weather was still holding, so I went out and touched up the caulk on the top trim board on the garage side and added a piece of Trex to cover some plastic that was showing at the top were I didn't want it to. Then I worked on adding some trim pieces on the front. On the front I am going to have gardens and the bottom trim board will be covered, along with the portion that has just plastic sheeting. However, over by the door, I needed to take the Trex down further, as that will be exposed between the door, and the walls for the garden.
Those pieces required some trimming to fit around where the board under the threshold was not equal on both sides. Took a little while to get a good fit. Then I worked on the board that goes between the west retaining wall, and the master bedroom window.
Now things have been popping around the house with spring actually arriving. I have a variety of green things sprouting. Some would be regarded as weeds on most property. Right now, I can't plant what I want to have, since Adam still has dirt to move around, but the plants help reduce the amount of dirt that runs downhill with each storm, so if it will grow, I'll let it live (at least for now).
Last week, I still hadn't found the time to contact anyone about getting timbers, railroad ties, or rock to add to the end of the walls. All options that Adam and I discussed. Adam called me up last Wednesday, and told me he was doing some clearing work for the person who had sold me the property originally, and had some rock that I might be interested in. The old farm house on her property had burned to the ground, and she had built a new house. The old fireplaces were still standing, and she wanted to get them out of the middle of her lawn. They were made of stone, and brick. She had asked Adam to just push the rocks back into her woods. He called me up to see if I would like them for my retaining walls. I went out and took a look at them, and then Adam and I looked over my situation again. I told him I would take it all, and would find uses for the rocks and the bricks.
Last Thursday night, I had a new delivery of materials.
That is quite a pile of rock for the front walls.
A smaller pile to add to the walls on the garage side.
I haven't decided for sure how the bricks will be used.
Last weekend we only got a few hours out at the house on Sunday, but Matt was able to join us. That helped us get work done faster. We cut sheets of plywood into 3" wide strips to go at the bottom of the walls. This is an odd item. The ICF blocks won't hold nails, so if you want to put in baseboards, you either have to attach the baseboards with screws or you have to attach wood to the ICF with screws, and then nail the baseboards to the wood. We decided that adding a strip of plywood at the bottom of the walls, and then nailing into that would work best. Dad cut the sheets in half first with the circular saw, then we ran each piece through the table saw to make pieces just a little less than 3" wide. I am going to work on attaching those to the ICF walls since that is a pretty easy one man job. We also rough cut more 2x6 for the center wall draft blocks. Dad and Matt worked on cutting them, and I placed them next to the wall, so they are handy when we get to work on putting them in.
With a cloud of dust, another piece of lumber is reduced to wooden blocks.
We were going to work on finishing the garage opening, but after we started looking at it, we realized there were still some things to think about before we start attaching materials. The top of the garage door is down below the top of the opening, when it is closed. So we need to put in some material to lower the top gasket so it meets the door at the correct place. We got an idea of the situation so we can think about the options, and then we switched to another task.
With three of us there and nice weather, I decided to do some work on the trim boards. A number of the boards are too cumbersome for one or two people to install very effectively. So while we still had light, we cut the longer base pieces for the front, and got them installed.
The pieces running between the bedroom windows, and the front door are now on.
Tonight the weather was still holding, so I went out and touched up the caulk on the top trim board on the garage side and added a piece of Trex to cover some plastic that was showing at the top were I didn't want it to. Then I worked on adding some trim pieces on the front. On the front I am going to have gardens and the bottom trim board will be covered, along with the portion that has just plastic sheeting. However, over by the door, I needed to take the Trex down further, as that will be exposed between the door, and the walls for the garden.
That block is not what I will use for the garden walls, but it gives an idea of where they will be.
Those pieces required some trimming to fit around where the board under the threshold was not equal on both sides. Took a little while to get a good fit. Then I worked on the board that goes between the west retaining wall, and the master bedroom window.
Now things have been popping around the house with spring actually arriving. I have a variety of green things sprouting. Some would be regarded as weeds on most property. Right now, I can't plant what I want to have, since Adam still has dirt to move around, but the plants help reduce the amount of dirt that runs downhill with each storm, so if it will grow, I'll let it live (at least for now).
Front "lawn"
Good to have some things starting to grow on those hills.
Subscribe to:
Posts (Atom)
