Sunday, July 10, 2011

The drill's revenge!

Friday and Saturday were quite productive. Friday evening, Matt came up, and helped me work on some piping. First we worked on the pipes going through the garage wall. A long time ago, holes were arranged to go through the concrete garage wall for certain pipes that needed to get to the outside. I am finally putting those pipes in, and getting them ready for their intended purposes. I debated how to support these pipes. On the outside, they run through the Hardie panel, but on the inside, there was just a large hole. I decided to just use some of the Trex scraps I had laying around, to keep space held between the pipes as I sprayed foam in and around them. I also filled the pipe that went through the wall that I decided not to use. There are also two cables that you can see. Those go to the outside garage lights.


The three pipes will carry four things. One will be a vent for the battery box for my power system. It will allow hydrogen gas to exit the house and disperse, rather than building up in the battery enclosure and causing a risk for explosion. One will carry the propane line into the house, and also provide a conduit for a ground line to get outside and to a ground rod. The last one will be the air intake for the water heater. The outsides need to be finished, they currently just have fittings pushed on the ends to keep weather out.


Matt and I also worked on getting the radon vent run started. This goes out one of the vents under the overhang. This needed to transition from black corrugated plastic drain tile, to PVC pipe. It will have condensation in it, so it also needs to go through solid PVC pipe to get to the vent, so that any condensation can drain. This required a hodge podge of adapters, and some inventive sealing techniques. The drain tile fittings don't seal to it. They just direct water flow. This is a radon vent, so I needed to seal it up good. The spray foam I have used in various places, such as around the windows and other penetrations through the wall, is supposed to provide an air barrier. This pipe won't be under any real pressure, so I used some of the foam inside the fitting, and around it to seal it up. Then I sealed the top end of it to the PVC pipe with caulk in that junction. It made for an interesting site.


The adapter that I could get, went from the black corrugated pipe to 3" PVC. Since I didn't have any PVC that would normally be used for drain pipe in a 3" size, I used some of the gray conduit. It should be completely overkill, but I had it on hand. Then at the top I transitioned through another fitting to 2" pipe which will run over to the vent pipe.
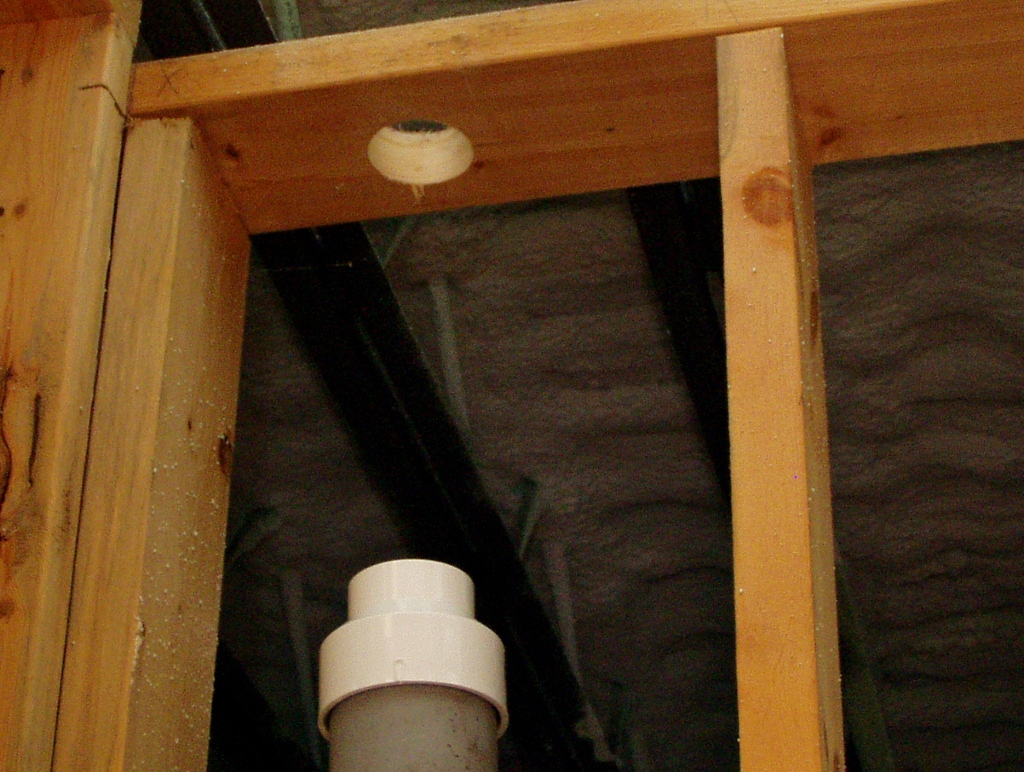

I had to angle the pipe over rather than run it vertically since if it ran straight up, it was going to run into a joist. The other option would have been to use a couple fittings to shift the pipe over. In this case though, since the connection on the bottom wasn't real ridged, it seemed more sensible to just tilt the pipe a little. If it was a vertical and solid PVC connection at the floor, I wouldn't do it this way.

Then I went home and got to bed. Adam and I were going to start early on Saturday so we could get some good work done before it got too hot.

We got a couple layers put on, and then I put in the tie back.


While I worked on the tie back, Adam did a little sculpting on the dirt at the end of the first retaining wall. He smoothed it out, so it wasn't a sudden drop. He left some of what he removed, up at the top to fill in as it starts to settle.


Things were a little muddy in places. The closest weather station reported almost 3/4 inch of rain on Friday morning. By the way, there was no sign of a leak Friday evening. I am just shaking my head pondering this.

Back to retaining wall construction. Adam and I continued to stack ties and pin them to one another. Then the drill decided to take another victim, it tried to do Adam in, and instead took out itself! Dad had a couple run ins with this drill. It has a lot of power, and a can rip itself out of your hands if the bit gets stuck. It has a lock that allows you to pull the trigger, and lock the drill on. Adam and I agree this is a bad feature on a drill this powerful. If I let go of the drill, it should just stop. Well, it got stuck in one of the ties, and Adam didn't realize he had pushed the lock. He got hit in the head by the drill (not sure what part of it hit him, he seemed OK after a minute). He had let go as it got away from him, but it sat there and spun, till it broke its own power cord! Well at least that stopped it. Adam had some crimp connectors in the truck, and I got the electrical tape. We spliced the power cord, and continued working. After that, most of the time then I held on to the plug while he was drilling so if need be, I could pull the plug, literally. We got a couple more layers on and backfilled before we called it a day on the retaining wall.


I did some more work in the afternoon. I was trying to get the Trex trim sealed to the windows, so that there would be less chance of bugs finding a gap where they could build a nice protected nest. I didn't have quite enough caulk though, so I had to get more today to finish the job. I am hoping that this week we might be able to get the walls finished up. We certainly should be able to finish the one we are working on right now, but I am not sure how long it will take to do the ones by the garage. I am expecting them to be shorter in both height and length, so they should take less time.

Thursday, July 7, 2011

A hot time at the house

It has been a fairly productive week. The generator conduit run is finished. It still needs to have wires spliced, but the conduit is all in place now.


Plants have been growing quite well.

Where's my house?

I have some plants with lovely little flowers that are providing a "border" to my driveway.


We were going to need more of the pieces of re-bar to hold the next retaining wall together, so I worked a while last Saturday, and turned a few long pieces of re-bar into many short pieces.

Adam had also removed some of the bushes that were in the way of my trenching, so as the ground dries out some more, I will be back to digging my trench.


Then Matt came out and helped me work on finishing the blocking on the support wall. We set up some shade for the generator. I think it has shut down before because of getting too hot with no wind and out in the sun.


With Matt's help, I finished the blocking.


I had also made a purchase. Every time I got up on the scaffold inside, at some point I would hit my head on the joists. So I got myself a hard hat.


It helps to keep the skull from hurting. I am sure it will be handy to have as I work on running ductwork, wiring and plumbing up through the joists.

Tuesday, Adam came over and worked on more grading around the retaining wall extension.


Today, we met out at the house, and started the second extension. We made some good progress with the ties we had left. By lunch we were exhausted and called it a day for working on the extension.


After lunch, I picked up the plates to put on the bolts for the tie backs. They turned out quite nice. I was thinking of painting them, but decided that with the weathered wood, it would look better to let them rust on the surface naturally.


With the current weather being pretty hot, I think Adam and I are going to work in the evenings, and weekend mornings on the retaining walls. Working during late morning or afternoon, just exhausts us.

Tuesday, June 28, 2011

Wire; retaining; gallons of water

When I decided to build an earth sheltered house, with a green roof, I did a lot of reading. I understood that when there is a leak (no matter what you do, at some point there will be a leak) it can be tricky to track down. My leak seems to have a mind of its own. I know there is a leak, since water does come in, at least some times, when it rains. We tried redoing the flashing around the roof box, which seemed to be the logical place where water should be coming in. That seems to have reduced the leaking significantly. However, there is still a leak somewhere.This past weekend, while we were working on running electrical wires for the generator (more on that in a bit) we filled jugs with water from the well, and systematically worked our way out and south from the roof box. Logically, we should have been able to get the roof to leak, when we poured water in a location where the upper layers of the waterproofing are failing. We tried all afternoon and into the evening, and probably dumped 50 gallons or more over that time, onto where the leak should be. However, the roof didn't leak! I have lost track of what plan I am on, but the next plan is to put another layer of plastic down, and a tarp over that, to cover the area to the south of the roof box and about 20 feet wide. This isn't the ideal fix, but the ideal fix most likely would involve having to tear off the dirt, the drainage layer, and then put down a new waterproofing layer over the whole roof. I can't do that right now. Hopefully the additional plastic and tarp will prevent the water from being able to get to where the leak is, and therefore prevent it from getting in.

Last Thursday, the 23rd, we started running wires for the generator. We had fished string through the underground conduits previously, and now we used the string to pull a rope through. We tied the rope to each wire that we needed to run, and while dad fed wire into the one end, I pulled the rope and wire through. We got the wiring started and then continued with it on Saturday, while we were trying to make my roof leak. Mom helped on Saturday. She kept checking on whether the roof was leaking, and also relayed instructions between dad and I. I was out in the field, and dad was in the garage. With that, and the fact that we had the generator running, dad and I could not shout to one another to stop pulling wire, or to indicate that the wire was all the way through. We got the wires for the generator all run. There are 3 black wires to bring power in from the generator, and one green one for the ground. Then there are two gray cables going to the generator. One to carry power to the generator to run its battery charger for the starting battery. Then a second to connect to the starting circuit to tell the generator when to start and stop.

Power into the house

Last night, Matt came out with mom and dad, and we worked on getting the junction boxes put in place out in the field. The first junction box takes the wire and cables from the generator, and provides an enclosure on the entry point for the first underground conduit. We finished working using my work lights out in the field. So the picture was taken this morning.


We still have a couple more conduits to run over to the generator from the junction box. We are also going to put in some supports for the junction box rather than having it just be supported by the conduit. Hopefully tomorrow night we can get the other junction box installed.

The stone retaining walls didn't turn out quite the way I wanted them. They are too short, and steep. However, having them extended out further, would have added quite a bit of cost, and they were well more than had been budgeted already. It has been difficult to keep the dirt behind them from washing down the slopes. The weeds are now helping, but I wanted to lengthen the walls and reduce the slope. Adam had gotten me the rock that we thought we would use for this purpose. However, looking at what it was going to take to lay up all that rock safely, high enough to do what I wanted, I started to think that wasn't the way to go. I started looking for railroad ties, and I found that there was a greenhouse nearby that carried them. It wouldn't be too difficult to take Adam's trailer and go pick up a load of ties. I talked to Adam, and he was quite willing to help me build retaining wall extensions.

I started by looking at the existing walls to get an idea of how the extensions should be shaped and sized. The nice thing with using a material that is "relatively" easy to move and cut, and fairly inexpensive, is that it lends itself to having the plan get adjusted as you go. I had a rough sketch of what I thought I wanted to do, so I had a count of how many ties I thought we would need. I bought 24 to start with. My original estimate was that we would need 25 for both of the front walls. We have completed the first one, and have used 13 with some scraps left that may be used in the second wall.

Here is a picture of the wall on the east end of the house.

Before excavating and extending the wall.

We started last Friday. It rained multiple times during the day, and was actually chilly. However, we just kept going. Adam excavated with the Bobcat, and we used a shovel to clean off dirt on the blocks. Then we laid down a base of gravel. I had ordered a load of gravel, but the truck hadn't shown up by the time we were ready to get the base in, so Adam scraped some gravel off my driveway so we could keep working.

When the gravel truck showed up, they tried to back up the driveway. Adam had regraded it that morning, but you can't get a big truck up my driveway backwards. To top it off this driver had been the one to deliver my last load and knew they hadn't been able to go up backwards then. They said that when they were told the delivery was on my road, they were hoping it wasn't the place they remembered. Looks like my driveway is getting a reputation. Though they had difficulty turning around at the top, they managed. We put filter cloth down on the dirt, to keep most of it from getting into the gravel.

Using a level and the board we checked to see that the gravel was level before we set a railroad tie on it.

We started by going out about 12 feet from the end of the block wall, to see how it would work. We cut the ties and fit them in. Then we drilled holes down through them and put re-bar in to tie them together.

Starting the third coarse.

End of the day.

By the end of the day, we had a pretty good part of the extension done. But we had a couple changes to the layout. Looking at the ground, we decided we were going to need to take the wall out further. I also decided that we needed to take the wall up a few more coarses, and that I was going to want to tie the tallest part of the wall back into the hill behind it.

Today, we continued the wall. Adam started out by moving more dirt out of the way so we could lengthen it.

Digging out about another 7 feet.

We added on another set of 3 ties, and decided that wasn't enough, so we put on a 4th.

We put in the tie back to help keep the extension from leaning out. Then we put up another two coarses on the first part of the extension, and decided that looked pretty good. So then we finished putting gravel behind the extension, and Adam regraded the hill.


I am fairly pleased with how this one turned out. We should be able to do a little better with the rest, having learned some lessons from building this one. I am hoping that next week we can get started on another one of the extensions. Adam thinks that with the extensions in place, he will be able to reduce the slope on the south west berm, and be able to drive the Bobcat up it, and dump and compact dirt. Hopefully he will, that will save a lot of time over if I have to haul dirt over there in my wagon a couple hundred pounds at a time to bring the top of the berm back up to roof level.

Monday, June 20, 2011

Of mice and men

Last Saturday we made some very good progress. We were going to fill some buckets, and try pouring water in various places to see where the leak might be. Mom dad and I headed for the house in the morning, and I drove through a pretty heavy rain storm. I figured the roof was going to already be leaking, so we wouldn't have a good opportunity to test for where the water was getting in. Thats OK, there are plenty of things to work on even if it rained all day. When we got there, it was raining, but not too hard. I decided that to unload things from the truck, and keep mom dry when she got out, I would actually park the truck in the garage. I opened the garage, and dad and I got things moved out of the way so I had a clear area almost back to the back wall of the garage. I needed to back in, since we had some Trex in the back to unload. Dad stood in the garage and guided me in. I pulled the truck back to as close to the doors as I wanted to be.

We didn't move the double doors for the utility room out of the way yet.

Hmmm, well I still had a couple feet to the wall. So I should be fine right? Well....

It didn't quite fit!

When I can pull the truck all the way in, it will fit, but it won't leave much room in front or back. I really want a smaller vehicle, but right now, the truck has practical advantages in being able to haul stuff to the house. Once construction is done though, I may be in the market for a different vehicle.

So besides testing my garage, what else did we do you ask? Well, while it rained, we set up the generator outside, with its rain cover, and we worked on fitting and installing more of the draft stop blocks in the main support wall. We are now about 2/3 of the way done on that. Another 2 or 3 hours, and we will probably be finished with that job.

I checked to see how the leak was doing, and I didn't see any water coming in! Say what! I looked out, sure enough it was pouring down outside pretty good, but no water was coming in. Now I was confused. It leaked the previous Friday, but today it had decided not to. I decided I would check back later in the day to see if the leak showed up.

In the afternoon, the weather got quite a bit better, and we worked on finishing the underside of the overhang. We got the foam trimmed back, and I caulked the seams between the panels, and the edges of the holes in the Hardie soffit panels. Then we installed the vent grills. They turned out pretty good.

Unobtrusive, but functional.

Dad and I also worked on getting the rest of the vertical trim boards put up.


After getting to look at it, I have decided not to put any diagonal pieces on. They would probably be a bit much, and once we get the curved pieces on over the windows, I think it will have a finished look. We are also going to install Hardie panel on the front of the overhang. That will be somewhat of a challenge. We have jigs to construct to help us hold the panels in place while they are getting attached.

We check on the roof leak before we left for the day, and no sign of water. I was still scratching my head. But I have some theories I am working on. We will see how the testing of this works out. Stay tuned.

Oh, about the mice. I have had some issues with mice since I have had even just my little plastic storage unit sitting in the field. I had mice get into that in the cold months, and make nests, and shred anything made of paper to use as bedding. I fully expected that when the house was done, and I had things inside that they would smell and want to get to, that I would have to set traps in the garage to take care of them before they got into the living area. I had seen mice in the garage already, when I moved my pile of scrap material. I had seen paper towels that had obviously been chewed on. This weekend, I found droppings on top of my stud walls, so they have been climbing up my walls and probably having a fun time running around my joists. So I knew that at times I was having visitors. I thought that with having put the gaskets around the garage door, that they would be kept out pretty well. I think I may have trapped at least one inside the house.


I believe this is an exit wound from a mouse. I say exit, because, although I know that mice have been in the house, it doesn't seem to offer them enough attraction at this time of year, with no food inside, to cause them to work to make an entry. I may be wrong, I may just have some mice that think I build a much better burrow than they can. If so, I will take it as a compliment. I am working on a way to block this off, so that it will make it much less likely they will get back in. Those who are industrious enough to enter though, will have a cold reception. Marcus has already given me his recommendation on the brand of trap to get, and recommends peanut butter for bait.

Wednesday, June 15, 2011

It still leaks! :-(

Last Wednesday, dad helped me spread gravel around the roof box. We were sure that we had gotten it all sealed up this time.


Then we worked on getting the rest of the T-bar up under the overhang. Finally ready to foam, caulk, and put on the vent covers.


I still had some trimming to do on the pipes so the T-bar would fit, and even after cleaning up, I am sure I was quite a site at dinner, with bits of PVC on me and my clothes.

Friday evening a storm was coming through. I still went out. I wanted to see if everything stayed dry. It didn't. I still had a leak. Although it looks to be less than it was, water is still getting in somewhere and coming in at the roof box. I am working on plans on how to find the leak.

Over the weekend, I did some straightening up of tools and materials, and did some sweeping. I put some materials we won't need right now, into storage, so they are out of the way.

Monday night, Matt was available, and came up to help me. We got the scaffold out, and I put spray foam in around the vent pipes. I wanted to seal between them and the Hardie boards, so that I wouldn't get moisture from the vented air, condensing on top of the Hardie boards in the winter and causing problems. The first can of foam, had a problem with the nozzle. Once I got the seal broken, it wouldn't completely shut off. So this made working with the foam a little more challenging than it usually is. With the second can, the nozzle tip broke, so I had to use my bare finger to push the nozzle and get foam to come out. I made a mess of myself, and this can also leaked. I didn't need all the foam in that can, so I had to just let it leak in the front "lawn".

My rendition of the BLOB.

It is difficult to judge how much foam is enough, so I got a little more up there than I needed, and will have to do some trimming.


Matt also helped me get a couple more Trex trim boards up.

We got the boards up on both sides of the dining room window.

Last night I got the two trim boards for beside the front retaining walls cut and trimmed so they are ready to go up. I am hoping that tomorrow night, I can get them up, and get the other vertical trim boards cut to length, so when I have another set of hands to help me, I can get those up.

Tuesday, June 7, 2011

Bob was right!

Looks like I do indeed have poison hemlock. Purple/red mottling on the stem, the right sort of flowers and leaves, and they are tall. Life is full of surprises, but even I wasn't expecting this to show up. Oh, well, at least they are nice to look at.


Monday, June 6, 2011

I've got what growing beside my house?

Well, this last weekend was productive, and surprising. Dad, Matt and I got the last of the panels installed under the overhang, as the sun was setting Friday night. It felt very good to get that done.

Then on Saturday, mom, dad and I went out, and worked the whole day.

We looked over the generator and how we would get it hooked up. We found that in keeping with the excellent user friendliness I have experienced so far with the generator (Yes that was sarcasm!) the gas line inside the generator housing was located such that the battery that was specified for the generator would not possibly fit!

While I worked on cutting the T-bar to go on the overhang, dad worked with the gas line to see if he could find a way to "Make iit fiit". Funny enough the gas line inside the generator had a Z shape, and the way they installed it, the top part was shorter than the bottom. Dad took it off, and flipped it right side up, and then the full battery area was clear. They installed the gas line upside down!

After the generator was taken care of, dad and I worked on getting the pieces of the second T-bar installed under the overhang.


I have one more T-bar to fit, cut and install. Then some foam around the vent pipes to seal things up, and the vents go on.

After we picked up the battery for the generator, I used it to water the roof. I wanted to do some testing before I put all the bags back in place, and the only way to do that at the moment, is to put a sprinkler on the roof, and pump water from the well.


It put some water up there, and the roof didn't show any signs of leaking, but it was nothing compared to the storms we have been having up until the last couple weeks. I didn't have much of any other option, so after we ran some water up there, I put the dirt bags back in place. I am going to get some pea gravel for right around the box, to promote as much drainage as I can right there.

There were a couple unexpected sightings at the house. In the late afternoon, a strange pattern was observed on the floor in my dining room.


I will let you guess as to nature of its formation.

The other unexpected thing, was the plants have been doing very well on the slopes by the house. I had these plants growing in a few spots, but most prolifically next to the retaining wall to the south of the garage.


I have had Queen Anne's Lace before and I thought I had some that had just really gone to great heights to impress me. Then I talked to Bob. He told me to be careful, this plant was too tall to be Queen Anne's Lace, and it was the wrong time for the blooms to be out. He told me that I probably have poison hemlock! Well, no one expects poison hemlock in their back yard. I have to go check on some details, but it sounds like that is what I have. Guess I don't have to worry about the deer eating those plants.

We finished off Saturday by doing some more trim work on the front of the house. I am hoping to do some more work on this this week.


Sunday afternoon we did some cleanup at the house where Matt is residing. The bushes in front had gotten really overgrown. We now have a front yard full of clipping, well more like branches. I think they are destined to either be mulched, composted, or burned at my place. We are hoping to haul them to my place Wednesday, and I am going to take some of the English ivy growing at my parents house, and try to get it established in a few places around my house. It might actually put up a good fight with the current botanical residents of my yard.