Monday, September 27, 2010

Installing in the skylight

Marcus has been dropping hints, that I should put another post together. Well my dad has been helping me quite a bit, but various things have been impeding progress. Weather fortunately has not been one of them.

I have been wanting to get the rest of the furring on the garage side, so it is ready for Hardie panel, and trim. Well, I worked on getting more furring up. It was slow work by myself, since I only have two hands. I needed a second person to hold the pieces in place, while I attached them. The remaining pieces were somewhat large and heavy to hold with one hand, while attaching with the other. I took some framing lumber that was laying around, and put it to work. I leaned it up against the furring strips, then I could concentrate on attaching them. This is much slower though, than having a helper. Here is how the work on the garage side proceeded:

A couple evenings working by myself, and I managed to get almost all the furring finished, and got the plastic flashed around the window.

Dad came out on a Saturday, and we got the rest of the Trex attached on that side.
Now ready for panels to be applied.

After we got the Trex on, we started working on cutting the foam for under the overhang. According to our plans at the time.

All the foam is cut according to the plans.

Something came up, and we had to leave earlier than we had planned. Last Monday dad and mom came out, and we started to install the foam, and put the Trex boards under it, and secure them to the joists, with the bolts we had prepared a while back. We got two pieces attached, and were working by flashlight. Things just weren't working out the way they were supposed to. To get the Trex into the proper position at the ends, we were having to tighten it enough, that the board was bowing in the middle. We were also having trouble getting the two boards to be level with respect to one another. I went out on Tuesday to look over the situation again. I took a string and strung it from the bottom of the joists on one end, to the bottom of the joists at the other end, just inside the front boards. When the string was level, it would only touch the two joists it was attached to. Some of the joist ends were over an inch higher than the string. I moved the string over next to the house wall, and there were only small differences in the location of the joist bottoms. Hmmm, what is going on with these joists.

Yes, the bottom of the joists are not straight, they bow upwards!

Ok, since the bottoms of the joists are not straight, it will not be possible to have the Trex boards be straight if they and the foam are snugged up to the bottom of joists. Time for yet another change to plans.

Dad and I had some ideas we batted around. I think we now have the new plan put together. The other evening I replaced the board at the front door, that Doug had put in place when they poured the concrete floor. I wanted to have a little insulation and use something that wouldn't rot. I measured and with dad's help, installed a trex board in place of the wood board.

The board is attached to the house on both ends. The boards pushing against the middle, were just there for while the spray foam set up.

Since I was going to have to order some parts to work the new plan for the overhang, I decided we should get the roof box finally finished. To install the roof box and seal it up, was rather complex, and took us all Saturday (starting around 8:30 and going until almost dark), and working a few hours this afternoon. I knew this was going to be an involved and time consuming process, and I wanted to make sure we had enough time to do it right, and not get it half way done, and then have to stop, and worry about rain coming in and leaking in through unfinished waterproofing.

Preparations for installing the roof box, started back in June, when I had cut the roof deck. This weekend I turned that hole through the roof deck, briefly into a skylight. I hated the idea of cutting through the waterproofing layers that have been working so well. But certain code requirements dictate that certain things have to go through the roof.

The utility room had a skylight this weekend.

We ran a long drill bit up through the foam, and the waterproofing, from the inside, to show where the hole needed to be cut. Then we cut the waterproofing from on top. That small hole let in a lot of light. If it weren't for the concerns over trying to leakproof a roof like this, and the cost, I would certainly like to have skylights in a few places in the house.

After we had the initial hole cut through the drainage, waterproofing, and foam, we had to expand the hole in the foam to accommodate the roof box. The roof box position, was dicated by only one of the pipes that was going to run through it. The vent for the plumbing system, was set in the concrete of the floor, and it was best if the pipe going through the roof extended directly above it. When the framer built the wall separating the garage and utility room, he put three boards at the top of it, then extended it with a short wall section up to the joists. That extra extension of the wall, was going to get in the way of putting the pipes in, and it didn't provide any required structural support to the wall. So we cut out a section to make the work a bit easier.

The reciprocating saw, has come in handy.

We took out a small piece of the third board on the top of the wall as well.

The wall is not load bearing, three boards was really a bit much. You can see where we cut a hole for the vent pipe to go through. Back up on the roof, we dropped the pipe that would be going up through, down the hole. We still had some more roof deck to cut to clear the pipe. Once we got that cut, we positioned the roof box. Then we cut the drainage, waterproofing and foam back so the box could fit down onto the roof deck.

Roof box inserted in place. We had a very good fit!

After we had the box inserted, we attached it with screws to the roof deck. The first thing we did to restore the waterproofing, was to bring the plastic up the sides of the box, and seal up the corners.

Using flashing tape to turn the plastic into flashing.
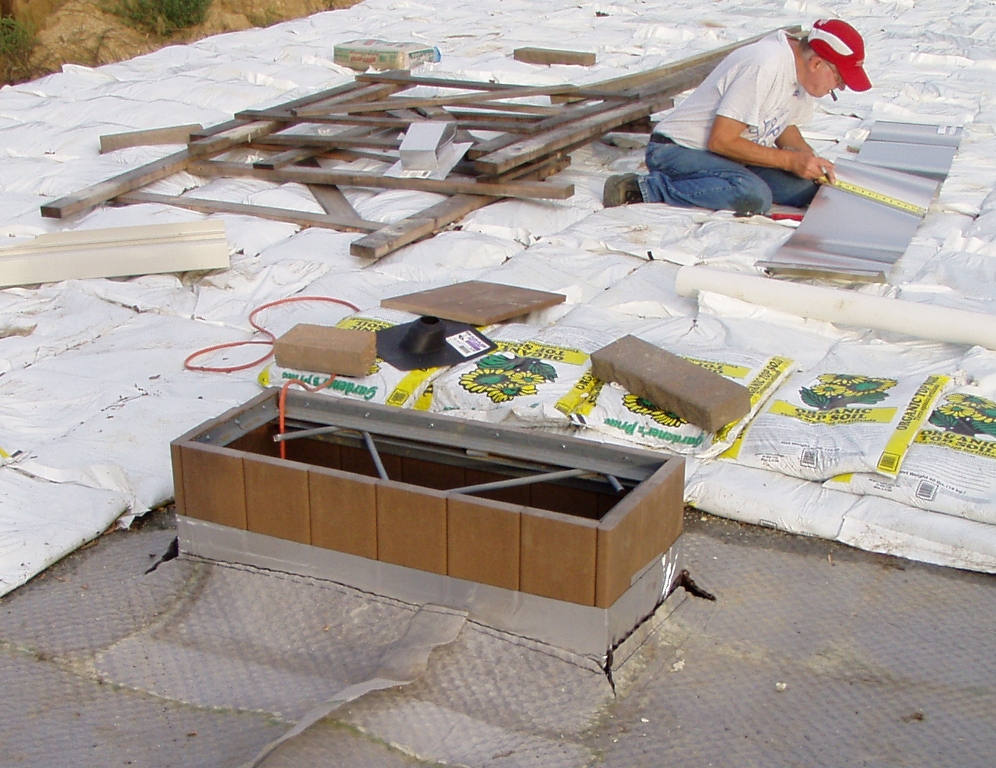
The plastic is thoroughly taped and the drainage material is brought back in to the box.

The next step was to make sure that water that came down the sides, would run down onto the drainage material, and not even get to the plastic waterproofing. To do this, we took a strip of aluminum flashing, and covered the sides and directed the bottom out onto the drainage. In the picture above, dad was cutting the corners of the flashing material we had fashioned to go around the box.

Box is wrapped!

We applied flashing tape around the bottom of the box to encourage water to flow out onto the drainage material.

We covered it up, to keep out curious critters, and called it a day. Then this afternoon, we worked to get the pipes installed, and the cap on the box. I had gotten a sheet of aluminum for us to make the cap for the box. We bent the sheet using some left over framing material and a piece of wood that had been used for delivering the steel joists! We used the tailgate of the truck as our workbench.

It turned out quite nicely, and had a very good fit.

After we had the cap made, we cut holes in the top for the pipes to go through. We put a piece of Trex in the top of the box, to provide support for the cap. Then we installed the various vents. With putting the dirt bags back in place, putting some bricks and sand around the base, here is how it turned out.

Dryer vent one the left, water heater vent, and the plumbing vent.

When the rooftop landscaping is finished, even less of the box will show. Only the top third of the original box will be above ground.

Sunday, September 12, 2010

Playing with blocks, bags, and sand

Last week, my dad and I got the rest of the drip edge added to the sides of the overhang, and going over to the retaining walls. It was getting late though, and the pictures didn't turn out too well.

Today, I went out, and worked on getting the area around the drip edge finished up. As I said, I wanted to put sand under the outriggers, and I had quite a few bags that had been originally bought to help hold materials on the roof, before the dirt bags were loaded on. Back in March we made extensive use of them to hold the tarps and foam in place. Now they have finished serving their original use, so they get re-used.

I pushed sand under the outriggers, and laid down some behind the drip edge to give the dirt bags a bit more even base. I filled in the areas between boards and such. Then I hauled more bags of dirt on the roof. Now the roof is completely covered, and the only areas left where bags will need to be moved around, are where the roof penetrations will go through, and along the garage side, which doesn't have its drip edge yet.

Oh, remember the edging blocks I got back in May? Now you get to see what I had planned for them. A few have gotten broken along the way, and the 50 I had gotten, may not have been enough to begin with, but I will just have to see when I do the garage side if I need to get more. I put the edging blocks up on the drip edge board. They will help in holding the dirt on the roof.

This is what the front looks like as of this afternoon

Tuesday, September 7, 2010

Laboring to build a house

The last week has been fairly productive. My dad and I took my mom to help my grandparents get ready to move. My dad and I made good use of the time spent traveling 1000 miles. We discussed the approach we would use for various elements of the siding, overhang, and drip edge details.

This last weekend we made use of the 3 day weekend, and continued to work on getting the facade on the overhang, and the walls next to it done. We needed to add some furring strips to the buffer boards to space the trim and siding materials out the proper distance so they would match the rest of the wall. To space the Hardie panel out from the buffer boards, we needed about a 1/4 inch spacer. We drilled holes in the aluminum pieces we had left from fabricating the furring strip reinforcements for the garage side. These will go behind the Hardie panels on the side toward the retaining walls and added to the buffer board thickness (3/4 inch) will place it out the same distance from the surface of the ICF walls as the 1 inch thick Trex deck boards that will be used as furring strips on the rest of the wall. I didn't want to leave the cut Hardie panel edges exposed next to the retaining walls, and so we needed to fabricate a piece of Trex to provide a space between the buffer boards and the trim board, so that it would be able to overlap the edge of the Hardie panel. We didn't have a planer (we aren't sure how well a planer would have worked with the Trex anyway) so we used the table saw, and cut a thin strip off the surface of the boards to make them thinner. This was what was left behind.

The picture doesn't do justice to the pile of Trex dust

We realized on Saturday as we looked at the walls, that trying to have the Hardie panel go all the way up the buffer boards between the retaining wall and the overhang, was likely to have a lot of difficulties. Looking at it I saw that it would look better to continue the Trex trim boards from the overhang to the retaining walls. So we cut boards to about the right size, then put them up, and marked where they ran into the blocks, and made adjustments, and continued until they fit very well.

A close fit to the retaining wall

Sunday, Matt came out, and we worked on the drip edge for the front of the overhang. We cut a groove along the bottom of the top board a little back from the outside edge. We did this so that any water running down from the top, would drip off rather than running back to where the boards are connected. We attached a 12 foot trim board, to a 16 foot deck board. We did that in the garage, then took the whole assembly up on the roof. Here is where it was best to have three people.

Fastening the trim board to the the deck board underneath.

The drip edge sitting in position

We found yet another issue as we placed the drip edge pieces in place. I had noticed earlier, as I was getting the foam blocking between the joists, sealed up, that the joists looked to vary somewhat in and out along the wall. We found that when we put the drip edge up, there was a place where dad could put his hand up behind it, yet it met the trim boards at the two ends. From a very awkward position, I sighted along the trim boards. They bowed in! Well, we hadn't put spacers in behind the Trex boards we attached to the joists, so there is probably some variance from that in addition to the joist ends not hanging quite the same distance out from the wall.

I was worried this would compromise our ability to securely attach the drip edge to the trim boards. I was just going to use the weight of the earth on the roof edge to hold the top of the drip edge down securely. I decided we needed to better secure the back edge of the drip edge, and we needed to seal up the gap we were going to have between the drip edge and the trim boards.

Labor Day, we picked up more Trex deck boards, and some thick weather stripping. We cut the boards to make what I am calling outriggers. We went to the house, and got the weather stripping attached to the bottom board on the drip edge, and put the first edge in place. We started fastening on the front, and got the screws to pull the board in pretty well. We attached where we had the boards on the front of the joists, so we had the thickest material available to fasten into.

We trimmed the 16 foot deck boards on the drip edges, and put in a partial trim board to finish the front drip edge. Here is how it looks.

Front drip edge in place and secured

We attached the outriggers, so that they will provide extra holding power to keep the drip edge from trying to lean off the front. I am going to put some sand under the outriggers before I cover them, so they are supported to minimize stress where they are attached to the drip edge. This will result in a well secured drip edge with no penetrations through the roof waterproofing.

Outriggers attached to help hold the drip edge on the roof

We cut the groove in the drip edge, so that it wraps around to meet the groove in the boards we will put on the sides of the overhang. Here you can see a little more detail.

You can see the side groove at the back of the board

I am hoping that tomorrow evening we can finish the rest of the drip edge details, and I will have a photo to show of how it looks with it all in place.

Saturday, August 28, 2010

Plan change 456382...

A co-worker (Kevin) came out to help us get the front on the overhang. Kevin and my dad went up on top with a tape measure to help me decide where we were going to put the seams in the Hardie panels. As we looked things over, the measurements just weren't turning out vary nice. This piece was going to need to be 6' 5" and the next 7' 3", the measurements were all over the place. Not only was the pattern of plates on front of the joists messed up, but the spacing was varying quite a bit. We talked it over, and I looked at where the seams were going to have to be. Because of the various issues with the positioning of plates for support, we would not be able to make the Hardie panels even and symmetric. Because of the positioning of the joists, the seams were not going to align with the aesthetically pleasing locations below either. For instance, the seams would be further away from the one side of the door than the other. They wouldn't line up with any sensible positions. So, the plan for the overhang reverted to a previous plan. I had a previous plan to use some of the Trex to cover the front of the overhang. The seams would not stand out, so the fact that they wouldn't line up nicely with details below them wouldn't be very noticeable.

Kevin helping my dad get the first board hung on the front of the overhang.

Last weekend, one of the things we worked on was getting the furring strips put up over the garage. First we put up some tape that will help keep the holes that the screws go through sealed up. This is the same tape that we put on the overhang.
Tape applied

Then we put up the furring strips. These are the ones that we had made with the aluminum attached to stiffen them.

Furring strips ready for siding

We also got the rest of the boards cut for the front of the overhang. While dad was cutting those boards, Kevin helped me cut and put foam up in the area over the wall, and inside the overhang. This will get sealed up when I have the contractor in to spray foam on the underside of the roof to seal it up. We got quite a bit done, and as we were working, I spotted yet another volunteer on my roof.


On Sunday, Adam called me. He had some time available, and was wondering if I had some earth moving he could do. I told him that I thought we could use dirt from in front of the house, and work on burying the south corners. I went out, and watched Adam, and pointed out how I wanted things. He moved quite a bit of dirt.

Adam and his Bobcat moving dirt.

Adam was able to get a lot of earth moved, before he had a hose break. He had to park the Bobcat and was going to need to go buy a new hose. Later that day, Kevin and mom and dad showed up, and we got the other two boards put up for the bottom row on the overhang.

Now another 3 boards to put up to complete the front of the overhang

Last Monday, Matt came out with mom and dad. We managed to get all three boards put up for the second row. So now the front of the overhang was covered.

The overhang front is covered

On Wednesday night mom and dad came out again. As I came up the driveway, a neighbor was waiting to greet me...


After I drove up in, the raccoon came over to the house, and was checking things out. It was not afraid of us, and we were a bit concerned.

Inspecting the retaining wall

We managed to shoo it off, and worked on planning how we were going to cover the ends of the overhang. One of my neighbors (two legged kind) came over and we chatted for a while. Thursday night we went out again, and managed to get the ends on the overhang. So, next, we need to put the boards up that will protect the top corners and keep water from getting behind the Trex we put up on the sides of the overhang.

Monday, August 16, 2010

The earth is retained

Friday I went out to the house, to pick up some tools and materials for making the furring strips that will go over the garage. Scott's guys were out there finishing up the walls on the garage side. I came up with mom and dad on Saturday, and found that they had just a few more blocks to put on the one retaining wall. I didn't see any blocks laying around, so I was guessing their estimate was off by just a few, and they needed to haul a few more out to finish the job. As dad and I got setup to work on the final touches to the waterproofing on the overhang, we heard a big truck down on the road. Up the driveway came the wall builders, with more dirt and a few more blocks. It looked like they were planning to finish the walls Saturday morning. They got the truck unloaded, and started putting in the last few blocks. They finished up the wall, packed up and cleaned up. Now I had all my walls.

Front walls

Garage walls

One large thing off the list of things to do. While they were finishing the walls, my dad and I were finishing the waterproofing on the overhang. I wanted to put an edging of foam along the overhang so that it would encourage water to flow away from the front of the overhang. I cut foam boards to lay under the final layer of plastic. As we turned one of the pieces around, dad found that he was bleeding. He apparently got a paper cut on the edge that I had just cut on the foam. (I was wearing my gloves, he wasn't wearing his)

Dad modeling the paper towel/packing tape band aid.

Things went quite well, until around lunch time. It had gotten too hot to be working out on the south side of the house. So we went for lunch. I checked on some conduit fittings that I will need, and we headed back to do some work in the shade behind the house. Well, as we got back, we saw that it had rained. That was going to limit what we could do outside if it was a significant rain. We got back and found that things were somewhat muddy, but not bad. As we went around making sure tools were brought in, in case it rained more, the sky started to darken. Thunder rumbled. Well, looks like we will have to see what we can do working inside. The wind came up, and then the rain started. It was blowing into the garage, so we had to close the door, so things in there didn't get soaked. We went around to the front and watched out the windows. This was a real gully washer. I watched as lightning flashed just a little bit away, and I heard the thunder simultaneously, it was real close.

After the storm passed, dad and I went out to check things over. The dirt around the house was now a field of mud. We were able to climb up the ends of the blocks on the one retaining wall by the garage, and survey things without trudging through the mud. It looked like the plastic on the overhang was staying basically in place. We went and checked on the daylight drain for the foundation drainage (we had not seen it draining water before, and I had concerns that the drainage might be plugged). No problem there, the cap on the end to keep critters from making a home in the drain line, had been blown off and was lying a few feet from where water was pouring out of the drain line. It had quite a bit of dirt in it, and my guess is that some of the dirt that I know had settled in the drains while they were not properly terminated, was getting washed out. Before I could get a picture of this, the rain started again. We ran back inside, and closed the garage again. I went to the front windows, and watched as the trees bent in the wind, and the rain went almost horizontal.

I am dry, but in front of the house is a mud pit.

We watched inside, as pieces of wood in front of the house actually started to float. The fellows who built the retaining walls had not filled in the area next to the house and retaining wall on the east side. It was a low spot, and water was flowing into it. The puddle there got to be a few inches deep. We watched as mud flowed and fell around the end of the retaining wall. The rain stopped again, since we couldn't work outside, we decided to test a way of cutting the Hardie panels that are going to be used as siding. The recommendation from the manufacturer, is that you take a knife, and score the surface of the board a few times, then bend it at the score to snap it. We tried this while the rain started up again outside. It worked very well. No dust, and a fairly clean edge. After the rain stopped again, we went out front, on the boards we have in front of the front door. The whole front of the door was wet. But it had kept out the water. The puddle by the retaining wall was already down a few inches from where it had been. Obviously the drainage in front was working as well. We decided to leave before any more rain moved in.

Sunday afternoon, we decided to just work on the furring strips that will go above the garage door. Since they will have to extend above the Nudura walls, and will provide support to the top of the siding, as well as the drip edge construction, I wanted to stiffen the Trex. To do this, we decided to fasten aluminum bars to the side of the boards. This should provide a very stiff and strong support from the concrete walls, up to the roof. We had to cut the aluminum to the proper lengths. Dad did this in the front lawn at his house.

No need to sweep up the aluminum sawdust.

We drilled holes in the aluminum, and then attached it to the sides of the Trex boards.

Aluminum, attached to Trex, with stainless steel screws.

Next steps are getting the Hardie panels installed on the front of the overhang, and working to install the furring strips we made, over the garage. It looks like things have dried out sufficiently to work on the overhang tomorrow.

Wednesday, August 11, 2010

The walls rise, and the overhang closes in

Well, the walls got moved. Scott had the walls taken back down and lined up where I had wanted them.

Now being built where they were supposed to be.

They worked on getting the walls put up, and getting them inspected as they went. Here are some pictures of how each wall has been going...


While they have been building walls, I have been working to get the overhang all sealed up, and closed in. Some of the challenge is just from trying to get something like this, very well insulated, and then waterproofed, and then still having a good way to attach the finish materials to the outside. The other challenge, is in dealing with the "as built" structure. For instance, every other joist was supposed to have a metal plate on the end, where we could attach materials to. Well, the way the joists were installed, we have a change in the pattern.

They changed the pattern of where the plates were!

So, now I need to sit down, and figure out where I am going to put seems and details in the finish materials, so they look good on the outside, but are also securely attached. I want the design to be symmetric, but the attachment points are not.

Adam came over, and worked on moving the dirt around to work toward the final grade. He is working the ground around the walls quite well. With the insulation and furring strips on the front, it is getting closer, to being fully closed in.


Now Marcus has his own ideas of what I should be doing. He gave me an artist's impression of what the hole should look like.

I'm afraid, that if Marcus wants a round door, he will have to build his own Hobbit Hole.